Improving Azure Functions Blob Trigger Performance and Reliability - Part 1: Memory Usage

This is the first part of a series or articles.

When creating blob-triggered Azure Functions there are some memory usage considerations to bear in mind.

“The consumption plan limits a function app on one virtual machine (VM) to 1.5 GB of memory. Memory is used by each concurrently executing function instance and by the Functions runtime itself.” [Microsoft]

A blob-triggered function can execute concurrently and internally uses a queue: “the maximum number of concurrent function invocations is controlled by the queues configuration in host.json. The default settings limit concurrency to 24 invocations. This limit applies separately to each function that uses a blob trigger.” [Microsoft]

So, if you have 1 blob-triggered function in a Function App, with the default concurrency setting of 24, you could have a maximum of 24 (1 * 24) concurrently executing function invocations. (The documentation describes this as per-VM concurrency, with 2 VMs you could have 48 (2vm * 1 * 24 concurrently executing function invocations.)

If you had 3 blob-triggered functions in a Function App (assuming 1 VM) then you could have 72 (3 * 24) concurrently executing function invocations.

Because the consumption plan “limits a function app on one virtual machine (VM) to 1.5 GB of memory”, if you are processing blobs that are non-trivial in size then you may need to consider overall memory usage.

OutOfMemoryException When Using Azure Functions Blob Trigger

As an example, suppose the following function exists:

public static class BlobPerformanceAndReliability
{
    [FunctionName("BlobPerformanceAndReliability")]
    public static void Run(
        [BlobTrigger("big-blobs/{name}")]string blob, 
        string name, 
        [Blob("big-blobs-out")] out string foundData,
        ILogger log)
    {
        log.LogInformation($"C# Blob trigger function Processed blob\n Name:{name} \n Size: {blob.Length} Bytes");

        // Code to find and output a specific line
        foundData = "This line will never be reached if out of memory";
    }
}

The preceding function code is triggered by blobs in the big-blobs container, the omitted code towards the end of the function would find a specific line of text in the blob and output it to big-blobs-out.

We can create a large file (appx. 1.8 GB) with the following code in a console app:

using System.IO;

namespace ConsoleApp1
{
    class Program
    {
        static void Main(string[] args)
        {
            using (var sw = new StreamWriter(@"c:\temp\bigblob.txt"))
            {
                for (int i = 0; i < 40_000_000; i++)
                {
                    sw.WriteLine("Some line we are not interested in processing");
                }
                sw.WriteLine("Data: 42");
            }
        }
    }
}

The contents of the last line in the file will be set to “Data: 42”.

If we run the function app locally and upload this big file to the Azure Storage Emulator, the function will trigger and will error with: “System.Private.CoreLib: Exception while executing function: BlobPerformanceAndReliability. Microsoft.Azure.WebJobs.Host: One or more errors occurred. (Exception binding parameter 'blob') (Exception binding parameter 'name'). Exception binding parameter 'blob'. System.Private.CoreLib: Exception of type 'System.OutOfMemoryException' was thrown.”.

The reason for this is that when you bind a blob trigger/input and bind to string or byte[] the entire blob will be read into memory, if the blob is too big (and/or there are other function invocations executing concurrently also processing big files) it will exceed the memory restrictions of the Functions Runtime.

Processing Large Blobs with Azure Functions

Instead of binding to string or byte[], you can bind to a Stream. This will not load the entire blob into memory and will allow you to instead process it incrementally.

The function can be re-written as follows:

public static class BlobPerformanceAndReliability
{
    [FunctionName("BlobPerformanceAndReliability")]
    public static void Run(
        [BlobTrigger("big-blobs/{name}")]Stream blob,
        string name,
        [Blob("big-blobs-out/{name}")] out string foundData,
        ILogger log)
    {
        log.LogInformation($"C# Blob trigger function Processed blob\n Name:{name} \n Size: {blob.Length} Bytes");

        // Code to find and output a specific line            

        foundData = null; // Don't write an output blob by default

        string line;

        using (var sr = new StreamReader(blob))
        {                
            while (!sr.EndOfStream)
            {
                line = sr.ReadLine();

                if (line.StartsWith("Data"))
                {
                    foundData = line;
                    break;
                }                    
            }
        }            
    }
}

If you’re not familiar with using streams in .NET, check out my Working with Files and Streams in C# Pluralsight course.

If we force the same blob to be reprocessed with this new function code, there will be no error and the output blob containing “Data: 42” will be seen in the big-blobs-out container.

Another thing to bear in mind when processing large files is that there is a timeout on function execution.

In the next part of this series we’ll look at how to improve the responsiveness of function execution when new blobs are written and also improve the reliability and reduce the chances of blobs being missed.

If you want to fill in the gaps in your C# knowledge be sure to check out my C# Tips and Traps training course from Pluralsight – get started with a free trial.

SHARE:

Handling Errors and Poison Blobs in Azure Functions With Azure Blob Storage Triggers

(This article applies to Azure Functions V2)

An Azure Function can be triggered by new blobs being written (or updated). If an unhandled exception occurs in the function, by default Azure Functions will retry the blob 5 times. This means the function will be triggered again for the same blob up to 5 times. If the same blob causes errors 5 times, no further attempts will be made and the processing of the blob will be “lost”.

Understanding Blob Processing Errors in Azure Functions

When a new (or updated) blob triggers a function, the Azure Functions runtime makes sure that the same blob is not processed twice (if no error occurs in the function execution). To do this the runtime makes use of “blob receipts”. These are stored in the Azure storage account associated with the function app (as defined in the AzureWebJobsStorage Function App settings).

As an example, suppose a new blob (called “followupletterrequest.data”) triggered the following function:

class FollowupLetterRequest
{
    public string FirstName { get; set; }
    public string LastName { get; set; }
}

public static class PoisonBlobExampleFunctions
{
    [FunctionName("PoisonBlobExampleFunctions")]
    public static void Run(
        [BlobTrigger("followup-letters/{blobname}.data")]string blobData, 
        string blobname,
        [Blob("followup-letters/{blobname}.txt")] out string letter,
        ILogger log)
    {
        var settings = new JsonSerializerSettings
        {
            MissingMemberHandling = MissingMemberHandling.Error
        };

        // This code assumes blob JSON is valid, if not an exception will be thrown
        var request = JsonConvert.DeserializeObject<FollowupLetterRequest>(blobData, settings);

        string firstName = request.FirstName;
        string lastName = request.LastName;

        letter = RenderFollowUpLetterText(firstName, lastName);
    }
    
    private static string RenderFollowUpLetterText(string firstName, string lastName)
    {
        string simulateLetterText = WaffleEngine.Text(paragraphs: 3, includeHeading: false);

        return $"Dear {firstName} {lastName}\r\n \r\n{simulateLetterText}";
    }
}

After the function runs, in the storage account under a path like “azure-webjobs-hosts/blobreceipts” the blob receipt can be seen. On a development machine using the local storage emulator the full path would be something like: “blobreceipts/desktop/DontCodeTiredDemosV2.PoisonBlobExampleFunctions.Run/"0x8D69224161F4590"/followup-letters/followupletterrequest.data”.

This full path to the blob receipt blob represents:

  • Function Id that the blob triggered (DontCodeTiredDemosV2.PoisonBlobExampleFunctions.Run)
  • Blob Container Name (followup-letters)
  • Name of triggering blob (followupletterrequest.data)
  • Triggering blob version ETag (“0x8D69224161F4590”)


If we now added another new blob called “followupletterrequest_bad.data” that contains bad data (e.g. a missing JSON property), so that an exception is thrown, a second blob receipt will be generated: “blobreceipts/desktop/DontCodeTiredDemosV2.PoisonBlobExampleFunctions.Run/"0x8D692245985E910"/followup-letters/followupletterrequest_bad.data”.

Because this blob generated an error, after the default number of retries (5) there will be no more attempts to process it.

Manually Forcing a Blob to Be Reprocessed

The documentation states that if the blob receipt is manually deleted, this will force the blob to reprocessed. This may be suitable to force reprocessing of a set of blobs that failed processing due to some transient error such as a database or network being temporarily offline. You should obviously take care that reprocessing blobs wont cause problems such as duplicate orders, emails, etc. or other errors in the system. You  may also need to consider what would happen if blobs are retried in a different order and/or interleaved with new blobs being added. Also blobs may not be reprocessed immediately. Using the local function runtime development environment, once the blob receipt has been deleted, it seems that the function app needs restarting to cause the blob to be reprocessed (either that or I didn’t wait long enough…). Once deployed to Azure there can be a delay between when the blob receipt is deleted and the blob being retried, the following timeline shows the delay between the blob receipt being deleted and the retry attempt 1.

2019-02-14 03:40:24.374 <attempt 1 - failure>
2019-02-14 03:40:24.763 <attempt 2 - failure>
2019-02-14 03:40:24.891 <attempt 3 - failure>
2019-02-14 03:40:25.007 <attempt 4 - failure>
2019-02-14 03:40:25.117 <attempt 5 - failure>
<blob receipt deleted>
2019-02-14 04:24:24.327 <retry attempt 1 - failure>
2019-02-14 04:24:25.155 <retry attempt 2 - failure>
2019-02-14 04:24:25.288 <retry attempt 3 - failure>
2019-02-14 04:24:25.455 <retry attempt 4 - failure>
2019-02-14 04:24:25.592 <retry attempt 5 - failure>

Automatically Responding to Blob Failures in Azure Functions

When a blob fails for the last time, information about the failure will written as a message to a Storage queue called “webjobs-blobtrigger-poison”. The message contains a JSON payload describing the triggering blob that didn’t complete processing successfully, for example:

{
  "Type": "BlobTrigger",
  "FunctionId": "DontCodeTiredDemosV2.PoisonBlobExampleFunctions.Run",
  "BlobType": "BlockBlob",
  "ContainerName": "followup-letters",
  "BlobName": "followupletterrequest_bad.data",
  "ETag": "\"0x8D692245985E910\""
}

The information contained in the JSON can be used to alert support people about the error and take appropriate action as required such as writing to a support ticket database or sending an email. You could also implement logic to automatically delete the blob receipt to force reprocessing but there would probably want to be some retry count otherwise bad data could cause an infinite processing loop. Exactly how you handle failed blob processing will depend on the business scenario.

As an example, the following function monitors the “webjobs-blobtrigger-poison” queue and grabs the information about the failed blob:

[FunctionName("PoisonBlobQueueProcessor")]
public static void PoisonBlobQueueProcessor(
    [QueueTrigger("webjobs-blobtrigger-poison")] string message,
    ILogger log)
{
    var poisonBobDetails = JsonConvert.DeserializeObject<dynamic>(message);

    log.LogInformation($"Found an unprocessed blob {poisonBobDetails.ContainerName}/{poisonBobDetails.BlobName}\r\n");
    
    // Send an email, log a ticket in a fault system, log a CRM issue, etc.            
}

If you want to fill in the gaps in your C# knowledge be sure to check out my C# Tips and Traps training course from Pluralsight – get started with a free trial.

SHARE:

Getting Blob Metadata When Using Azure Functions Blob Storage Triggers

(This article refers to Azure Functions V2)

Basic Blob Metadata

There are a few basic pieces of metadata that are often useful.

The following code show a simple example of a blob-triggered Azure Function:

[FunctionName("BlobMetadataExample")]
public static void Run(
    [BlobTrigger("decline-letters/{name}")]Stream myBlob, 
    string name, 
    ILogger log)
{
    log.LogInformation($"Name: {name} Size: {myBlob.Length} Bytes");
}

With the preceding code, if we add a blob called “declineletterrequest.data” to the “decline-letters” container, the function will be triggered with the output: “Name: declineletterrequest.data Size: 50 Bytes”.

Notice that the string name parameter has been automatically populated with the full name of the blob that triggered the function execution.

If you want to get the blob name and blob extension separately you could write the following:

[FunctionName("BlobMetadataExample")]
public static void Run(
    [BlobTrigger("decline-letters/{blobname}.{blobextension}")]Stream myBlob,
    string blobName,
    string blobExtension,
    ILogger log)
{
    log.LogInformation($"Name: {blobName} Extension: {blobExtension} Size: {myBlob.Length} Bytes");
}

If the preceding function executes we get the output: “Name: declineletterrequest Extension: data Size: 50 Bytes”.

In addition to being able to use this simple blob metadata in code, you can also use the elements of the triggering blob name in other bindings:

[FunctionName("BlobMetadataExample")]
public static void Run(
        [BlobTrigger("decline-letters/{blobname}.{blobextension}")]Stream myBlob,
        string blobName,
        string blobExtension,
        [Queue("output-queue-{blobextension}")] out string message,
        ILogger log)
{
    log.LogInformation($"Name: {blobName} Extension: {blobExtension} Size: {myBlob.Length} Bytes");

    message = "Hello world";
}

In the preceding code, the output queue that is written to is dependent on the extension of the triggering blob. If the triggering blob name was “declineletterrequest.bankofmars” then a message will be written to the queue “output-queue-bankofmars” or if the input blob was called “output-queue-bankofvenus” then a message would be written to the “output-queue-bankofvenus”.

You can also do a similar thing by binding an input blob binding to the contents of a triggering queue message.

Advanced Metadata

There are a number of additional metadata items that you can get by simply adding the correct method arguments with the correct names:

[FunctionName("BlobMetadataExample")]
public static void Run(
        [BlobTrigger("decline-letters/{blobname}.{blobextension}")]Stream myBlob,
        string blobName,
        string blobExtension,
        string blobTrigger, // full path to triggering blob
        Uri uri, // blob primary location
        IDictionary<string, string> metaData, // user-defined blob metadata
        BlobProperties properties, // blob system properties, e.g. LastModified
        ILogger log)
{
    log.LogInformation($@"
blobName      {blobName}
blobExtension {blobExtension}
blobTrigger   {blobTrigger}
uri           {uri}
metaData      {metaData.Count}
properties    {properties.Created}");
}

Executing the preceding code will give the following output:

blobName      declineletterrequest
blobExtension data
blobTrigger   decline-letters/declineletterrequest.data
uri           http://127.0.0.1:10000/devstoreaccount1/decline-letters/declineletterrequest.data
metaData      0
properties    12/02/2019 2:15:53 AM +00:00

The BlobProperties give you access to a host of information such as ETag, DeletedTime, ContentEncoding, etc.

You can use this additional metadata in further binding expressions, the following example shows how to bind a blob output name to the ETag of the original triggering blob:

[FunctionName("BlobMetadataExample")]
public static void Run(
[BlobTrigger("decline-letters/{blobname}.{blobextension}")]Stream myBlob,
string blobName,
BlobProperties properties,
[Blob("decline-letters/{properties.ETag}")] out string message,
ILogger log)
{
    message = "Hello world";
}

The preceding code would create an output blob with a name such as “0x8D6909193F68C10”.

If you want to fill in the gaps in your C# knowledge be sure to check out my C# Tips and Traps training course from Pluralsight – get started with a free trial.

SHARE:

Developing Tizen Samsung Galaxy Watch Apps with .NET and C# - Getting Started

This article assumes you have set up the Tizen/Visual Studio development environment as outlined in this previous article.

Installing the Watch Emulator

The first step is to install the relevant emulator so you don’t need a physical Samsung Galaxy Watch. To do this open Visual Studio and click  Tools –> Tizen –> Tizen Emulator Manager

This will bring up the Emulator Manager, click the Create button, then Download new image, check the WEARABLE profile, and click OK. This will open the Package Manager and download the emulator.

Installing the Tizen Wearable emulator in Visual Studio

Once the installation is complete, if you open the Emulator Manager, select Wearable-circle and click Launch you should see the watch emulator load as shown in the following screenshot:

watchemulator

Creating a Watch Project

In Visual Studio, create a new Tizen Wearable Xaml App project  which comes under the Tizen 5.0 section.

Once the project is created and the with the emulator running, click the play button in Visual Studio (this will be something like “W-5.0-circle-x86…” ).

The app will build and be deployed to the emulator – you may have to manually switch back to the emulator if it isn’t brought to the foreground automatically. You should now see the emulator with the text “Welcome to Xamarin.Forms!”.

This text comes from the MainPage.xaml:

<?xml version="1.0" encoding="utf-8" ?>
<c:CirclePage xmlns="http://xamarin.com/schemas/2014/forms"
             xmlns:x="http://schemas.microsoft.com/winfx/2009/xaml"
             xmlns:c="clr-namespace:Tizen.Wearable.CircularUI.Forms;assembly=Tizen.Wearable.CircularUI.Forms"
             x:Class="TizenWearableXamlApp1.MainPage">
  <c:CirclePage.Content>
    <StackLayout>
      <Label Text="Welcome to Xamarin.Forms!"
          VerticalOptions="CenterAndExpand"
          HorizontalOptions="CenterAndExpand" />
    </StackLayout>
  </c:CirclePage.Content>
</c:CirclePage>

Modifying the Basic Template

As a very simple (and quick and dirty, no databinding, MVVM, etc.) example, the MainPage.xaml can be changed to:

<?xml version="1.0" encoding="utf-8" ?>
<c:CirclePage xmlns="http://xamarin.com/schemas/2014/forms"
             xmlns:x="http://schemas.microsoft.com/winfx/2009/xaml"
             xmlns:c="clr-namespace:Tizen.Wearable.CircularUI.Forms;assembly=Tizen.Wearable.CircularUI.Forms"
             x:Class="TizenWearableXamlApp1.MainPage">
    <c:CirclePage.Content>
        <StackLayout HorizontalOptions="CenterAndExpand" VerticalOptions="CenterAndExpand">
            <Label x:Name="HappyValue" Text="5" HorizontalTextAlignment="Center"></Label>
            <Slider x:Name="HappySlider" Maximum="10" Minimum="1" Value="5" ValueChanged="HappySlider_ValueChanged" ></Slider>
            <Button Text="Go" Clicked="Button_Clicked"></Button>
    </StackLayout>
  </c:CirclePage.Content>
</c:CirclePage>

And the code behind MainPage.xaml.cs:

using System;
using System.Collections.Generic;
using System.Linq;
using System.Text;
using System.Threading.Tasks;

using Xamarin.Forms;
using Xamarin.Forms.Xaml;
using Tizen.Wearable.CircularUI.Forms;
using System.Net.Http;

namespace TizenWearableXamlApp1
{
    [XamlCompilation(XamlCompilationOptions.Compile)]
    public partial class MainPage : CirclePage
    {
        private int _happyValue = 5;

        public MainPage()
        {
            InitializeComponent();
        }

        private async void Button_Clicked(object sender, EventArgs e)
        {
            HttpClient client = new HttpClient();

            var content = new StringContent($"{{ \"HappyLevel\" : {_happyValue} }}", Encoding.UTF8, "application/json");

            var url = "https://prod-29.australiasoutheast.logic.azure.com:443/workflows/[REST OF URL REDACTED FOR PRIVACY/SECURITY]";

            var result = await client.PostAsync(url, content);
            
        }

        private void HappySlider_ValueChanged(object sender, ValueChangedEventArgs e)
        {
            _happyValue = (int)Math.Round(HappySlider.Value);

            HappyValue.Text = _happyValue.ToString();
        }
    }
}

The preceding code essentially allows the user to specify how happy they are using a slider, and then hit the Go button. This button makes an HTTP POST to a URL, in this example the URL is a Microsoft Flow HTTP request trigger.

The flow is shown in the following screenshot, it essentially takes the JSON data in the HTTP POST, uses the HappyLevel JSON value and sends a mobile notification to the Flow app on my iPhone.

Microsoft Flow triggered from HTTP request

Testing the App

To test the app, run it in Visual Studio:

Xamarin Forms app running in Samsung Galaxy Watch emulator

Tapping the Go button will make the HTTP request and initiate the Microsoft Flow, and after a few moments, the notification being sent to the phone:

Microsoft Flow notification on iPhone

If you want to fill in the gaps in your C# knowledge be sure to check out my C# Tips and Traps training course from Pluralsight – get started with a free trial.

SHARE:

Developing Samsung TV Apps with .NET - Getting Started

In 2018, Samsung started to release Smart TVs that support apps written in .NET. These TVs run on the Tizen operating system which is “an open and flexible operating system built from the ground up to address the needs of all stakeholders of the mobile and connected device ecosystem, including device manufacturers, mobile operators, application developers and independent software vendors (ISVs). Tizen is developed by a community of developers, under open source governance, and is open to all members who wish to participate.” [Tizen.org]

This means that apps can developed in Visual Studio using .NET, tested locally on a TV emulator, tested on a physical TV, and published/distributed on the Samsung Apps TV app store.

In this article you’ll learn how to set up your development environment, create your first app, and see it running on the TV emulator.

Part I - Setting Up Visual Studio for Samsung TV App Development

There are a number of steps to setup Visual Studio.

1.1 Install Java JDK

The first thing to do is install Java, the Tizen tools under the hood require Java JDK 8 to be installed and system environment variables setup correctly.

To do this the hard way, head over to Oracle.com JDK 8 archive page and download the Windows x64 installation. Note the warning before deciding whether or not to go ahead: “WARNING: These older versions of the JRE and JDK are provided to help developers debug issues in older systems. They are not updated with the latest security patches and are not recommended for use in production.” [Oracle.com] Also note “Downloading these releases requires an oracle.com account.” [Oracle.com]

To do it the easy way, open the Visual Studio Installer, check the Mobile Development with JavaScript payload and in the optional section tick the Java SE Development Kit option as shown in the following screenshot. (You may also want to install the Mobile Development with .NET payload as well as you can use Xamarin Forms to develop Samsung TV apps)
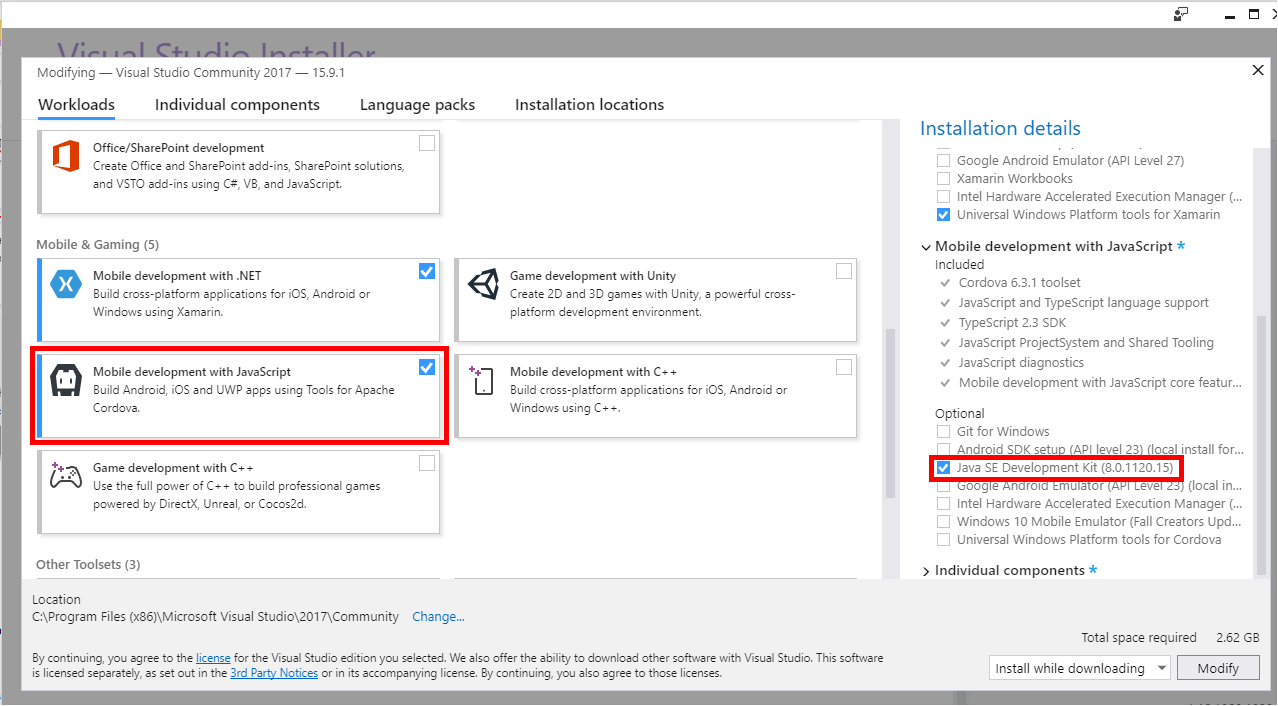
Installing Java 8 from the Visual Studio Installer

Once Java is installed you’ll need to modify system environment variables as follows:

  1. Add a system variable called JAVA_HOME with a value pointing to the path of the Java install, e.g: C:\Program Files\Java\jdk1.8.0_192
  2. Add a system variable called JRE_HOME with a value that points to Java JRE directory, e.g: C:\Program Files\Java\jdk1.8.0_192\jre
  3. Modify the Path variable value and add to the end: %JAVA_HOME%\bin;%JRE_HOME%\bin;”"

1.2 Install Tizen Visual Studio Tools

The next job is to install the Visual Studio Tizen related tools.

First, open Visual Studio and head to  Tools –> Extension and Updates. In the online section, search for “Tizen” and download the Visual Studio Tools for Tizen extension. Once downloaded, you’ll need to close Visual Studio and follow the prompts to complete the installation (it may take a little while to download the Tizen tools). Once complete re-open Visual Studio.

Next, in the Visual Studio menus, head to Tools –> Tizen –> Tizen Package Manager. This will open the Tizen SDK installer. Click the Install new Tizen SDK option as the following screenshot shows:
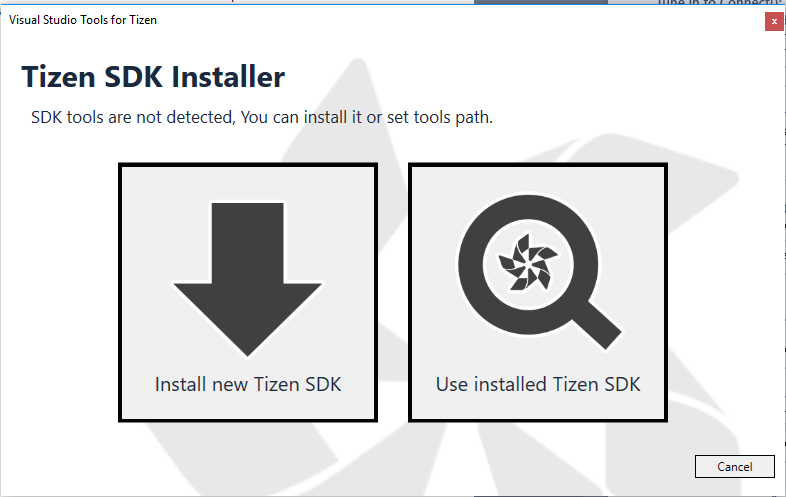
Tizen SDK Installer in Visual Studio

Choose an install location – you will need to create a new folder yourself – for example C:\TizenSDK

Follow the prompts and you should see the SDK installation proceeding:
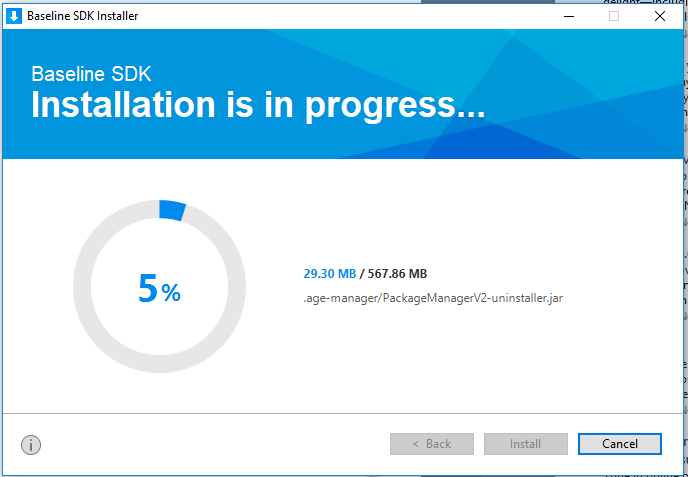
Tizen SDK intallation in progress

You will also be asked to install the Tizen Studio Package Manager, once again follow the prompts. Be patient, the Package Manager install may take some time “Loading package information”.

Once complete, all the dialog boxes should close and you can head back to Visual Studio.

1.3 Install the Samsung Studio TV Extensions

In Visual Studio, head to Tools –> Tizen –> Tizen Package Manager.

Head to the Extension SDK tab and install the TV Extensions-4.0 package:
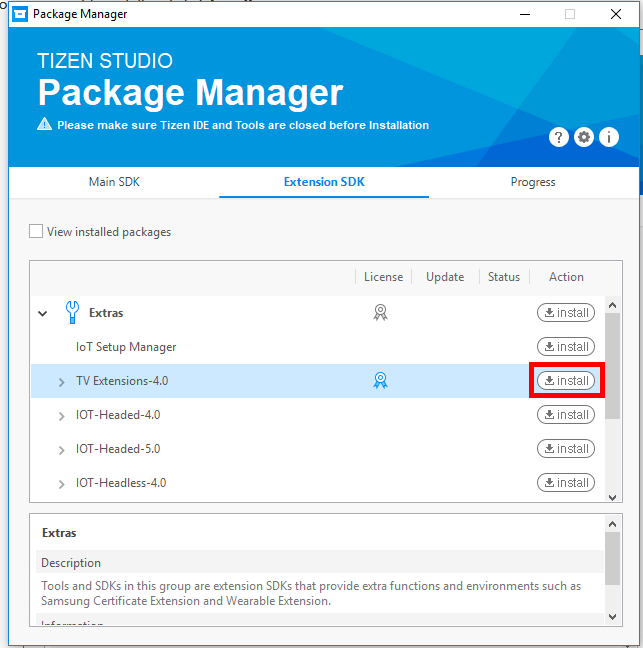
Install Tizen TV Extensions in Visual Studioe

Once again be patient (the progress bar is near the top of the dialog box).

Once installed, close Package Manager.

1.4 Verify Samsung TV Emulator Installation

Before trying to use the TV emulator check out the requirements (including turning off Hyper V  https://developer.tizen.org/development/visual-studio-tools-tizen/installing-visual-studio-tools-tizen

Back in Visual Studio, head to Tools –> Tizen –> Tizen Emulator Manager.

You should see HD 1080 TV in the list of emulators:
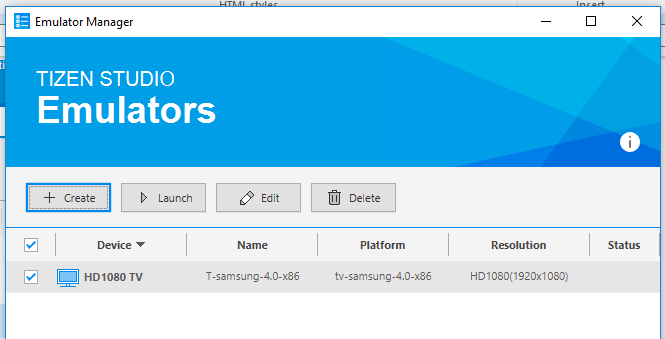
Tizen TV Emulator installed

1.5 Install Samsung TV  .NET App Templates

Head back to Visual Studio’s Tools –> Extensions and Updates menu, once again search online for Tizen, and this time install the Samsung TV .NET App Templates extension. This will give you access to the project templates. You may need to restart Visual Studio for the installation to complete.

Part II – Creating Your First Samsung TV .NET App

2.1 Create a new Samsung TV Project

Re-open Visual Studio and click File –> New Project.

In the Tizen Samsung TV  section, choose Blank App (Xamarin.Forms) template:
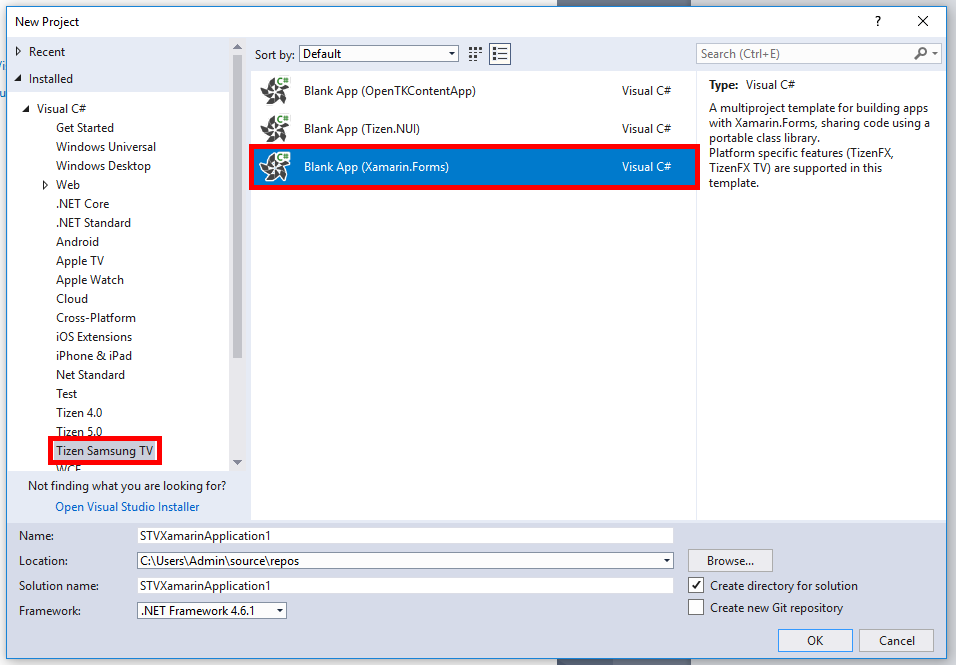
Blank App (Xamarin.Forms) Visual Studio Template

Click OK. This will create a very basic bare-bones app project that uses Xamarin Forms.

It is a good idea to head to NuGet package manager and update all the packages such as the Xamarin Forms and Tizen SDK packages.

Head into the “STVXamarinApplication1” project that contains the “STVXamarinApplication1.cs” file which in turn contains the App class. Inside the app class you can see the following code:

using System;
using System.Collections.Generic;
using System.Linq;
using System.Text;

using Xamarin.Forms;

namespace STVXamarinApplication1
{
    public class App : Application
    {
        public App()
        {
            // The root page of your application
            MainPage = new ContentPage
            {
                Content = new StackLayout
                {
                    VerticalOptions = LayoutOptions.Center,
                    Children = {
                        new Label {
                            HorizontalTextAlignment = TextAlignment.Center,
                            Text = "Welcome to Xamarin Forms!"
                        }
                    }
                }
            };
        }

        protected override void OnStart()
        {
            // Handle when your app starts
        }

        protected override void OnSleep()
        {
            // Handle when your app sleeps
        }

        protected override void OnResume()
        {
            // Handle when your app resumes
        }
    }
}

Modify the line Text = "Welcome to Xamarin Forms!" to be: Text = DateTime.Now.ToString()

Build the solution and check there are no errors.

2.2 Running a .NET App in the Tizen Samsung TV Emulator

In the Visual Studio tool bar, click Launch Tizen Emulator.

Launching the Tizen Emulator from Visual Studio

This will open the Emulator Manager, click the Launch button and the TV emulator will load with a simulated remote  as shown below:

Samsung TV Emulator

Head back to Visual Studio and click the run button (which should now show something like T-samsung-4.0.x86…):

Deploying an Samsung TV app to the emulator in Visual Studio

Once the button is clicked, wait a few moments for the app to be deployed to the emulator. You may have to manually switch back to the emulator if it’s not automatically brought to the front.

You should now see the app running on the emulator and showing the time:
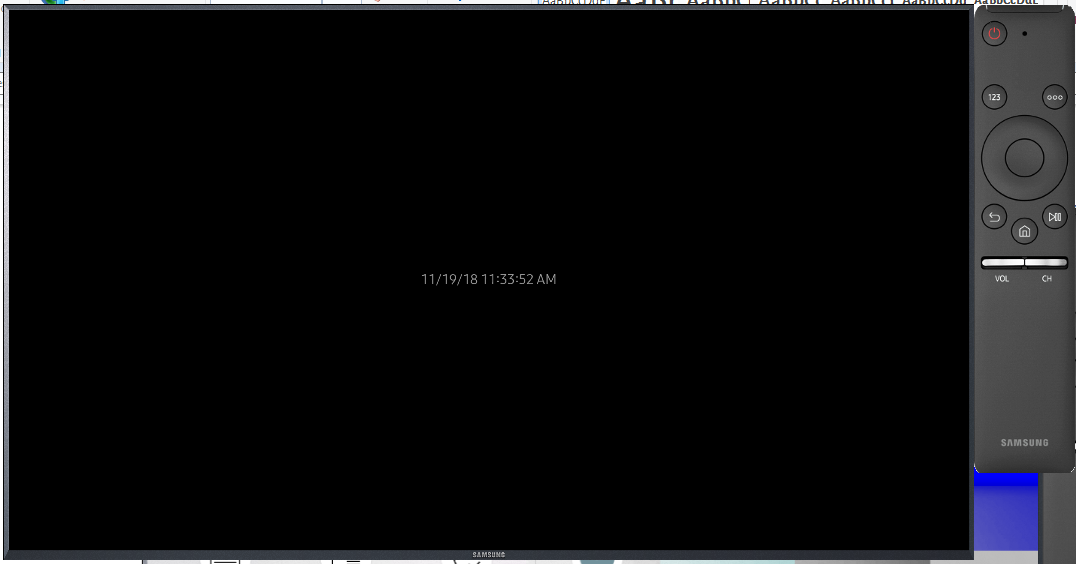
.NET app running on the Samsung TV emulator on Windows 10

If you want to read more about the Tizen .NET TV Framework, check out the documentation.

If you want to fill in the gaps in your C# knowledge be sure to check out my C# Tips and Traps training course from Pluralsight – get started with a free trial.

SHARE:

Azure Functions Dependency Injection with Autofac

This post refers specifically to Azure Function V2.

If you want to write automated tests for Azure Functions methods and want to be able to control dependencies (e.g. to inject mock versions of things) you can set up dependency injection.

One way to do this is to install the AzureFunctions.Autofac NuGet package into your functions project.

Once installed, this package allows you to inject dependencies into your function methods at runtime.

Step 1: Create DI Mappings

The first step (after package installation) is to create a class that configures the dependencies. As an example suppose there was a function method that needed to make use of an implementation of an IInvestementAllocator. The following class can be added to the functions project:

using Autofac;
using AzureFunctions.Autofac.Configuration;

namespace InvestFunctionApp
{
    public class DIConfig
    {
        public DIConfig(string functionName)
        {
            DependencyInjection.Initialize(builder =>
            {
                builder.RegisterType<NaiveInvestementAllocator>().As<IInvestementAllocator>(); // Naive

            }, functionName);
        }
    }
}

In the preceding code, a constructor is defined that receives the name of the function that’s being injected into. Inside the constructor, types can be registered for dependency injection. In the preceding code the IInvestementAllocator interface is being mapped to the concrete class NaiveInvestementAllocator.

Step 2: Decorate Function Method Parameters

Now the DI registrations have been configured, the registered types can be injected in function methods. To do this the [Inject] attribute is applied to one or more parameters as the following code demonstrates:

[FunctionName("CalculatePortfolioAllocation")]
public static void Run(
    [QueueTrigger("deposit-requests")]DepositRequest depositRequest,
    [Inject] IInvestementAllocator investementAllocator,
    ILogger log)
    {
        log.LogInformation($"C# Queue trigger function processed: {depositRequest}");

        InvestementAllocation r = investementAllocator.Calculate(depositRequest.Amount, depositRequest.Investor);
    }

Notice in the preceding code the [Inject] attribute is applied to the IInvestementAllocator investementAllocator parameter. This IInvestementAllocator is the same interface that was registered earlier in the DIConfig class.

Step 3: Select DI Configuration

The final step to make all this work is to add an attribute to the class that contains the function method (that uses [Inject]). The attribute used is the DependencyInjectionConfig attribute that takes the type containing the DI configuration as a parameter, for example: [DependencyInjectionConfig(typeof(DIConfig))]

The full function code is as follows:

using AzureFunctions.Autofac;
using Microsoft.Azure.WebJobs;
using Microsoft.Extensions.Logging;

namespace InvestFunctionApp
{
    [DependencyInjectionConfig(typeof(DIConfig))]
    public static class CalculatePortfolioAllocation
    {
        [FunctionName("CalculatePortfolioAllocation")]
        public static void Run(
            [QueueTrigger("deposit-requests")]DepositRequest depositRequest,
            [Inject] IInvestementAllocator investementAllocator,
            ILogger log)
        {
            log.LogInformation($"C# Queue trigger function processed: {depositRequest}");

            InvestementAllocation r = investementAllocator.Calculate(depositRequest.Amount, depositRequest.Investor);
        }
    }
}

At runtime, when the CalculatePortfolioAllocation runs, an instance of an NaiveInvestementAllocator will be supplied to the function.

The library also supports features such as named dependencies and multiple DI configurations, to read more check out GitHub.

If you want to fill in the gaps in your C# knowledge be sure to check out my C# Tips and Traps training course from Pluralsight – get started with a free trial.

SHARE:

Unit Testing C# File Access Code with System.IO.Abstractions

It can be difficult  to write unit tests for code that accesses the file system.

It’s possible to write integration tests that read in an actual file from the file system, do some processing, and check the resultant output file (or result) for correctness. There are a number of potential problems with these types of integration tests including the potential for them to more run slowly (real IO access overheads), additional test file management/setup code, etc. (this does not mean that some integration tests wouldn’t be useful however).

The System.IO.Abstractions NuGet package can help to make file access code more testable. This package provides a layer of abstraction over the file system that is API-compatible with existing code.

Take the following code as an example:

using System.IO;
namespace ConsoleApp1
{
    public class FileProcessorNotTestable
    {
        public void ConvertFirstLineToUpper(string inputFilePath)
        {
            string outputFilePath = Path.ChangeExtension(inputFilePath, ".out.txt");

            using (StreamReader inputReader = File.OpenText(inputFilePath))
            using (StreamWriter outputWriter = File.CreateText(outputFilePath))
            {
                bool isFirstLine = true;

                while (!inputReader.EndOfStream)
                {
                    string line = inputReader.ReadLine();

                    if (isFirstLine)
                    {
                        line = line.ToUpperInvariant();
                        isFirstLine = false;
                    }

                    outputWriter.WriteLine(line);
                }
            }
        }
    }
}

The preceding code opens a text file, and writes it to a new output file, but with the first line converted to uppercase.

This class is not easy to unit test however, it is tightly coupled to the physical file system with the calls to File.OpenText and File.CreateText.

Once the System.IO.Abstractions NuGet package is installed, the class can be refactored as follows:

using System.IO;
using System.IO.Abstractions;

namespace ConsoleApp1
{
    public class FileProcessorTestable
    {
        private readonly IFileSystem _fileSystem;

        public FileProcessorTestable() : this (new FileSystem()) {}

        public FileProcessorTestable(IFileSystem fileSystem)
        {
            _fileSystem = fileSystem;
        }

        public void ConvertFirstLineToUpper(string inputFilePath)
        {
            string outputFilePath = Path.ChangeExtension(inputFilePath, ".out.txt");

            using (StreamReader inputReader = _fileSystem.File.OpenText(inputFilePath))
            using (StreamWriter outputWriter = _fileSystem.File.CreateText(outputFilePath))
            {
                bool isFirstLine = true;

                while (!inputReader.EndOfStream)
                {
                    string line = inputReader.ReadLine();

                    if (isFirstLine)
                    {
                        line = line.ToUpperInvariant();
                        isFirstLine = false;
                    }

                    outputWriter.WriteLine(line);
                }
            }
        }
    }
}

The key things to notice in the preceding code is the ability to pass in an IFileSystem as a constructor parameter. The calls to File.OpenText and File.CreateText are now redirected to _fileSystem.File.OpenText and _fileSystem.File.CreateText  respectively.

If the parameterless constructor is used (e.g. in production at runtime) an instance of FileSystem will be used, however at test time, a mock IFileSystem can be supplied.

Handily, the System.IO.Abstractions.TestingHelpers NuGet package provides a pre-built mock file system that can be used in unit tests, as the following simple test demonstrates:

using System.IO.Abstractions.TestingHelpers;
using Xunit;

namespace XUnitTestProject1
{
    public class FileProcessorTestableShould
    {
        [Fact]
        public void ConvertFirstLine()
        {
            var mockFileSystem = new MockFileSystem();

            var mockInputFile = new MockFileData("line1\nline2\nline3");

            mockFileSystem.AddFile(@"C:\temp\in.txt", mockInputFile);

            var sut = new FileProcessorTestable(mockFileSystem);
            sut.ConvertFirstLineToUpper(@"C:\temp\in.txt");

            MockFileData mockOutputFile = mockFileSystem.GetFile(@"C:\temp\in.out.txt");

            string[] outputLines = mockOutputFile.TextContents.SplitLines();

            Assert.Equal("LINE1", outputLines[0]);
            Assert.Equal("line2", outputLines[1]);
            Assert.Equal("line3", outputLines[2]);
        }
    }
}

To see this in action or to learn more about file access, check out my Working with Files and Streams in C# Pluralsight course.

You can start watching with a Pluralsight free trial.

SHARE:

Customizing C# Object Member Display During Debugging

In a previous post I wrote about Customising the Appearance of Debug Information in Visual Studio with the DebuggerDisplay Attribute. In addition to controlling the high level  debugger appearance of an object we can also exert a lot more control over how the object appears in the debugger by using the DebuggerTypeProxy attribute.

For example, suppose we have the following (somewhat arbitrary) class:

class DataTransfer
{
    public string Name { get; set; }
    public string ValueInHex { get; set; }
}

By default, in the debugger it would look like the following:

Default Debugger View

To customize the display of the object members, the DebuggerTypeProxy attribute can be applied.

The first step is to create a class to act as a display proxy. This class takes the original object as part of the constructor and then exposes the custom view via public properties.

For example, suppose that we wanted a decimal display of the hex number that originally is stored in a string property in the original DataTransfer object:

class DataTransferDebugView
{
    private readonly DataTransfer _data;

    public DataTransferDebugView(DataTransfer data)
    {
        _data = data;
    }

    public string NameUpper => _data.Name.ToUpperInvariant();
    public string ValueDecimal
    {
        get
        {
            bool isValidHex = int.TryParse(_data.ValueInHex, System.Globalization.NumberStyles.HexNumber, null, out var value);

            if (isValidHex)
            {
                return value.ToString();
            }

            return "INVALID HEX STRING";
        }
    }
}

Once this view object is defined, it can be selected by decorating the DataTransfer class with the DebuggerTypeProxy attribute as follows:

[DebuggerTypeProxy(typeof(DataTransferDebugView))]
class DataTransfer
{
    public string Name { get; set; }
    public string ValueInHex { get; set; }
}

Now in the debugger, the following can be seen:

Custom debug view showing hex value as a decimal

Also notice in the preceding image, that the original object view is available by expanding the Raw View section.

To learn more about C# attributes and even how to create your own custom ones, check out my C# Attributes: Power and Flexibility for Your Code Pluralsight course.You can start watching with a Pluralsight free trial.

SHARE:

MSTest V2

In the (relatively) distant past, MSTest was often used by organizations because it was provided by Microsoft “in the box” with Visual Studio/.NET. Because of this, some organizations trusted MSTest over open source testing frameworks such as NUnit. This was at a time when the .NET open source ecosystem was not as advanced as it is today and before Microsoft began open sourcing some of their own products.

Nowadays MSTest is cross-platform and open source and is known as MSTest V2, and as the documentation states: “is a fully supported, open source and cross-platform implementation of the MSTest test framework with which to write tests targeting .NET Framework, .NET Core and ASP.NET Core on Windows, Linux, and Mac.”.

MSTest V2 provides typical assert functionality such as asserting on the values of: strings, numbers, collections, thrown exceptions, etc. Also like other testing frameworks, MSTest V2 allows the customization of the test execution lifecycle such as the running of additional setup code before each test executes. The framework also allows the creation of data driven tests (a single test method executing  multiple times with different input test data) and the ability to extend the framework with custom asserts and custom test attributes.

You can find out more about MSTest V2 at the GitHub repository, the documentation, or check out my Pluralsight course: Automated Testing with MSTest V2.

You can start watching with a Pluralsight free trial.

SHARE:

Prevent Secrets From Accidentally Being Committed to Source Control in ASP.NET Core Apps

One problem when dealing with developer “secrets” in development is accidentally checking them into source control. These secrets could be connection strings to dev resources, user IDs, product keys, etc.

To help prevent this from accidentally happening, the secrets can be stored outside of the project tree/source control repository. This means that when the code is checked in, there will be no secrets in the repository.

Each developer will have their secrets stored outside of the project code. When the app is run, these secrets can be retrieved at runtime from outside the project structure.

One way to accomplish this in ASP.NET Core  projects is to make use of the Microsoft.Extensions.SecretManager.Tools NuGet package to allow use of the command line tool. (also if you are targeting .NET Core 1.x , install the Microsoft.Extensions.Configuration.UserSecrets NuGet package).

Setting Up User Secrets

After creating a new ASP.NET Core project, add a tools reference to the NuGet package to the project, this will add the following item in the project file:

<DotNetCliToolReference Include="Microsoft.Extensions.SecretManager.Tools" Version="2.0.0" />

Build the project and then right click the project and you will see a new item called “Manage User Secrets” as the following screenshot shows:

Managing user secrets in Visual Studio

Clicking menu item will open a secrets.json file and also add an element named UserSecretsId to the project file. The content of this element is a GUID, the GUID is arbitrary but should be unique for each and every project.

<UserSecretsId>c83d8f04-8dba-4be4-8635-b5364f54e444</UserSecretsId>

User secrets will be stored in the secrets.json file which will be in %APPDATA%\Microsoft\UserSecrets\<user_secrets_id>\secrets.json on Windows or ~/.microsoft/usersecrets/<user_secrets_id>/secrets.json on Linux and macOS. Notice these paths contain the user_secrets_id that matches the GUID in the project file. In this way each project has a separate set of user secrets.

The secrets.json file contains key value pairs.

Managing User Secrets

User secrets can be added by editing the json file or by using the command line (from the project directory).

To list user secrets type: dotnet user-secrets list At the moment his will return “No secrets configured for this application.”

To set (add) a secret: dotnet user-secrets set "Id" "42"

The secrets.json file now contains the following:

{
  "Id": "42"
}

Other dotnet user-secrets  commands include:

  • clear - Deletes all the application secrets
  • list - Lists all the application secrets
  • remove - Removes the specified user secret
  • set - Sets the user secret to the specified value

Accessing User Secrets in Code

To retrieve users secrets, in the startup class, access the item by key, for example:

public void ConfigureServices(IServiceCollection services)
{
    services.AddMvc();

    var secretId = Configuration["Id"]; // returns 42
}

One thing to bear in mind is that secrets are not encrypted in the secrets.json file, as the documentation states: “The Secret Manager tool doesn't encrypt the stored secrets and shouldn't be treated as a trusted store. It's for development purposes only. The keys and values are stored in a JSON configuration file in the user profile directory.” & “You can store and protect Azure test and production secrets with the Azure Key Vault configuration provider.”

There’s a lot more information in the documentation and if you plan to use this tool you should read through it.

If you want to fill in the gaps in your C# knowledge be sure to check out my C# Tips and Traps training course from Pluralsight – get started with a free trial.

SHARE: