Blendable Silverlight (and WPF) MVVM Applications With Dependency Injection

Introduction

One of the challenges with the idea of having separate developer and designers is how to allow the developers to write code while at the same time designers are working on the UI.

The goal is to give designers working in Expression Blend some sample data that they can data-bind to, that will match the runtime data items without requiring additional build scripts\etc.

The Model-View-ViewModel (MVVM) design pattern is a popular way to architect a SL\WPF app to provide separation of concerns, testability, etc. This article assumes a basic understanding of the MVVM pattern.

Getting Started - Defining The ViewModel

We create an interface to define out ViewModel (we can do this for every distinct view in the application). Before we do this though, we need something to represent our model data, for example a person:

     public class Person
    {
        public string Name { get; set; }
        public int Age { get; set; }
    }

Next we can define our ViewModel interface to allow the user to edit a person's details, the idea is that our view (our XAML user control) will be bound to a class that implements this interface. All data and operations are provided by the ViewModel, i.e. the view has no direct contact with the model.

     public interface IEditPersonDetailsViewModel
    {
        Person PersonToEdit { get; set; }
    }

It is this interface that allows both the designer and developer to work with a single common, well-defined set of data items.

Creating Some Design-Time Data

Now we have defined what data our view will have access to, we can proceed to provide the designer with some sample data to work with.

Remember that one of the goals for us to be able to run the application without having to modify configurations or have extra scripts, i.e. we want our app to provide a 'real' ViewModel at runtime, but a 'dummy' one to the designer in Blend. One way of providing this to to implement a version of the Service Locator design pattern:

    public class ViewModelServiceLocator
    {
        public IEditPersonDetailsViewModel GetEditPersonDetailsViewModel
        {
            get
            {
                return new EditPersonDetailsViewModel_DesignTime();
            }
        }
    }

The GetEditPersonDetailsViewModel property (by using a property we can bind to it in Blend) at the moment always returns an instance of  EditPersonDetailsViewModel_DesignTime, we will modify this shortly.EditPersonDetailsViewModel_DesignTime is defined as:

     public class EditPersonDetailsViewModel_DesignTime : IEditPersonDetailsViewModel
    {
        public EditPersonDetailsViewModel_DesignTime()
        {
            PersonToEdit = new Person()
            {
                Name="Mr Design Time Data",
                Age=44
            };
        }

        #region IEditPersonDetailsViewModel Members

        public Person PersonToEdit { get; set; }

        #endregion
    }

It is an instance of this class will provide the design time data in Blend.

Binding to Design-Time Data in Blend

(You can download a trial copy of blend from Microsoft.)

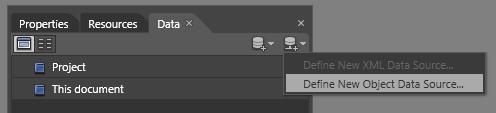
Open your project in blend and  on the Data tab choose "Define New Object Data Source...".


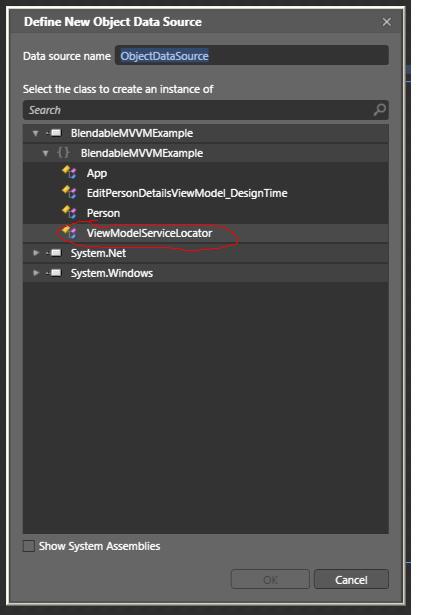
Select our ViewModelServiceLocator class and click OK.


Now we bind our usercontrol to an instance of ViewModelServiceLocator, you can do this by dragging from the data tab to [UserControl] in the Objects and Timeline pane:


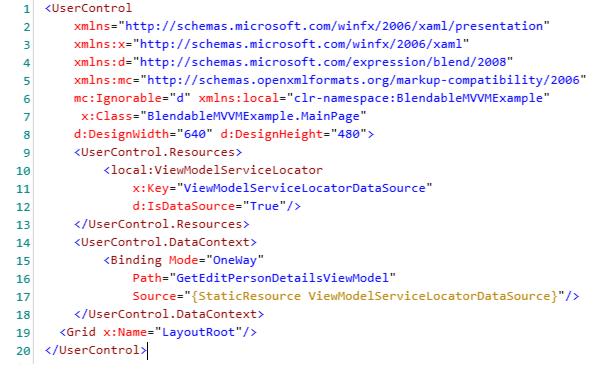
If you look at the xaml this creates, it's basically setting the DataContext of the entire user control to the return value of the GetEditPersonDetailsViewModel property.


Now the designer can (for example) bind a textbox to the person name:


So now we have a design time ViewModel bound in Blend. If we run the app now, we would get the design time ViewModel at runtime, so the next step is to provide a 'real' ViewModel at runtime.

Providing a Runtime ViewModel

First we define our ViewModel to be used at runtime (with a hard-coded person for illustration purposes):

    public class EditPersonDetailsViewModel : IEditPersonDetailsViewModel
    {
        public EditPersonDetailsViewModel()
        {
            PersonToEdit = new Person()
            {
                Name="Mr Runtime Data",
                Age=22
            };
        }

        #region IEditPersonDetailsViewModel Members

        public Person PersonToEdit{ get; set;}

        #endregion
    }

We can then modify our ViewModel service locator to provide our runtime version:

    public class ViewModelServiceLocator
    {
        public IEditPersonDetailsViewModel GetEditPersonDetailsViewModel
        {
            get
            {
                if (System.ComponentModel.DesignerProperties.IsInDesignTool)
                    return new EditPersonDetailsViewModel_DesignTime();
                else
                    return new EditPersonDetailsViewModel();
            }
        }
    }

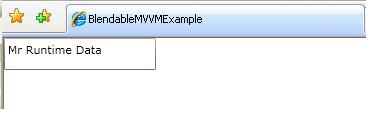
When we run the app we get our runtime version: 


In a real situation you could pass in the Person to be editied to the runtime viewmodel constructor and possibly use Dependency Injection to provide the dependency.

Adding Dependency Injection to the Service Locator

We can add another layer of abstraction by having the service locator delegate to a DI framework. The examples below are from another project which uses Ninject to provide DI.

    public class ViewModelServiceLocator
    {
        public IMainViewModel GetMainViewModel
        {
            get
            {
                return KernelHost.Kernel.Get<IMainViewModel>();
            }
        }


        public IAddNewWeightViewModel GetAddNewWeightViewModel
        {
            get
            {
                return KernelHost.Kernel.Get<IAddNewWeightViewModel>();
            }
        }


        public IPersonDetailsViewModel GetPersonDetailsViewModel
        {
            get
            {
                return KernelHost.Kernel.Get<IPersonDetailsViewModel>();
            }
        }
    }


    public static class KernelHost
    {
        static IKernel _kernel;
       

        static KernelHost ()
        {
            _kernel = new StandardKernel(new DI.StandardNInjectModule());
        }


        public static IKernel Kernel
        {
            get
            {             
                return _kernel;
            }
            set
            {
                _kernel = value;
            }
        }
    }


    public class StandardNInjectModule : StandardModule
    {
        public override void Load()
        {           
            // For normally injected IModel resolve using the instance provided by factory
            Bind<IModel>().ToFactoryMethod<IModel>(ModelFactory.Get);

            // For when a new IModel is required (and explicitly not required from thefactory)
            Bind<IModel>().To<Model>().Only(When.Context.Variable("createNewNotFromFactory").EqualTo(true));

            Bind<IModelStore>().To<IsolatedStorageModelStore>();
            Bind<IModelLoader>().To<ModelLoader>();


            Bind<IPerson>().To<Person>().WithArgument<string>("name", "No Name Specified").WithArgument<double>("heightCm",150);
            Bind<IBMICalculator>().To<BMICalculator>().Using<SingletonBehavior>();
            Bind<IWeightRecord>().To<WeightRecord>();
            Bind<IAggregateData>().To<AggregateData>();


            // Bind view models
            Bind<IMainViewModel>().To<MainViewModel>();
            Bind<IAddNewWeightViewModel>().To<AddNewWeightViewModel>();
            Bind<IPersonDetailsViewModel>().To<PersonDetailsViewModel>();
         

#region "Blend design time view models"
#if DEBUG
            Bind<IMainViewModel>().To<MainViewModelDesignTime>().OnlyIf(x => (System.ComponentModel.DesignerProperties.IsInDesignTool));
            Bind<IAddNewWeightViewModel>().To<AddNewWeightViewModelDesignTime>().OnlyIf(x => (System.ComponentModel.DesignerProperties.IsInDesignTool));
            Bind<IPersonDetailsViewModel>().To<PersonDetailsViewModelDesignTime>().OnlyIf(x => (System.ComponentModel.DesignerProperties.IsInDesignTool));
           
#endif
#endregion
        }
    }


SHARE:

Silverlight & WPF - Binding to a specific item in a collection

If you have a collection of items (for example a list of strings) that is assigned to the DataContext of a given XAML element (or parent element) you can use standard array index notation to get at a specific item in the list, just use Path=[n] where n is the item index.

For example:

<TextBlock Name="exampleBindingText" Text="{Binding Path=[3]}" />

With a DataContext set using the code:

            List<string> months = new List<string>()
            {
                "Jan", // 1st element in collection at index 0
                "Feb", // 2nd element in collection at index 1
                "Mar", // 3rd element in collection at index 2
                "Apr"  // 4th element in collection at index 3
            };

            exampleBindingText.DataContext = months;

Would result in the Text of the TextBlock outputting "Apr" as Path=[3] will get the 4th element in the collection.

SHARE:

Free Xaml drawing tool

I stumbled upon a nice (free) open source drawing application (a la Adobe Illustrator) which allows saving in SVG but also XAML! So if you don't want to/cannot afford to use Blend this could be a nice alternative, you can download from http://www.inkscape.org - should also mention you can get a 60-day evaluation copy of Blend 3 from Microsoft.

SHARE:

Thunder (beta)

I've been working on a Silverlight 3 drum machine/sequencer called Thunder, the first (beta) version is now available at:

http://www.dontcodetired.com/live/thunder/


It's a fully working version but the code base requires some re-factoring. Playback smoothness varies depending on the machine specs and how many instruments are playing at the same time.

Future improvements include the addition of more than 2 drum kits, the ability to use your own drum samples and attempting to improve the performance (although this seems to be limited by having to use a MediaElement to play a stream rather than an immediate .Play() method - hopefully in Silverlight 4 a lower latency sound playback mechanism will be introduced).

SHARE:

Countdown To Christmas 2009 Silverlight 3 app

For a bit of Silverlight 3 fun:


Use\install at: http://www.dontcodetired.com/live/christmascountdownbeta/

There are some things which need improving such as resizing when run out of browser, abilty to sort/hide/filter data etc.

SHARE:

Silverlight 3 WritableBitmap pixel colour values

Rather than taking an array of Color objects, the WritableBitmap.Pixels property holds an array on ints which represent premultiplied ARGB colour values. To set a given pixel to a given colour you have to take the alpha, red, green and blue values and convert them to a premultiplied ARGB int value.

The following code contains some helpers/extension methods to make the process bit easier, for example to set every pixel to red:

for (int index = 0; index < bmp.Pixels.Length; index++)
{
   Color myColour = new Color() { A = 255, R = 255, G = 0, B = 0 };
   bmp.Pixels[index] = myColour.ToWritableBitmapPixelValue();
}

 or using the Fill extension method:

bmp.Fill( new Color() { A = 255, R = 255, G = 0, B = 0 } );

WritableBitmapHelper class listing

using System;
using System.Net;
using System.Windows;
using System.Windows.Controls;
using System.Windows.Documents;
using System.Windows.Ink;
using System.Windows.Input;
using System.Windows.Media;
using System.Windows.Media.Animation;
using System.Windows.Shapes;
using System.Windows.Media.Imaging;

namespace BitmapAPI
{
    /// <summary>
    /// Helper methods\extension methods for dealing with WritableBitmap,
    /// in real world implementation you'd probably choose to separate the
    /// extension methods iinto separate static classes;
    /// eg WritableBitmapExtensions & ColorExtensions
    /// </summary>
    public static class WritableBitmapHelper
    {
        /// <summary>
        /// Converts ARGB byte values to an integer
        /// Based on info found at:
        /// http://blogs.silverarcade.com/silverlight-games-101/15/silverlight-writeablebitmap-pixel-format-in-silverlight-3/
        /// </summary>
        /// <param name="alpha">Alpha transparency: 0=transparent  255=solid</param>
        /// <param name="red">Amount of red: 0 to 255</param>
        /// <param name="green">Amount of green: 0 to 255</param>
        /// <param name="blue">Amount of blue: 0 to 255</param>
        /// <returns>An integer representing an ARGB color</returns>
        public static int CalcWritableBitmapPixelValue(byte alpha, byte red, byte green, byte blue)
        {
            // Calc premultiplier once only. We need to use premultiplied ARGB32
            // rather than convential ARGB.
            double alphaPreMultiplier = alpha / 255d;

            // Premultiply rgb values with alpha
            byte r = (byte)(red   * alphaPreMultiplier);
            byte g = (byte)(green * alphaPreMultiplier);
            byte b = (byte)(blue  * alphaPreMultiplier);

            return (alpha << 24) | (r << 16) | (g << 8) | b;
        }


        /// <summary>
        /// Extension method to convert a System.Windows.Media.Color to an integer value.
        /// </summary>
        /// <param name="color">The System.Windows.Media.Color to convert</param>
        /// <returns>An integer representing the ARGB values of <paramref name="color"/></returns>
        public static int ToWritableBitmapPixelValue(this Color color)
        {
            return CalcWritableBitmapPixelValue(color.A, color.R, color.G, color.B);
        }


        /// <summary>
        /// Extension method to 'fill' a WriteableBitmap with a given solid color
        /// </summary>
        /// <param name="bmp">The WriteableBitmap to fill</param>
        /// <param name="color">The Color to fill with</param>
        public static void Fill(this WriteableBitmap bmp, Color color)
        {
            for (int i = 0; i < bmp.Pixels.Length; i++)
            {
                bmp.Pixels[i] = color.ToWritableBitmapPixelValue();
            }
        }

    }
}


SHARE:

Silverlight 3 3D Animation Using PlaneProjection and Storyboards

While SL3 doesn't add full 3D support, you can now transform elements in a 3D fashion.

The following videos are recommended (and form the basis of this example) but I've used simple opacity rather than transforming an element off the screen:

http://silverlight.net/learn/learnvideo.aspx?video=187308

http://silverlight.net/learn/learnvideo.aspx?video=189248


The new PlaneProject allow you to 'skew' an element in X, Y and Z dimensions. UI elements now have a Projection property which can contain a PlaneProjection:

<Grid.Projection>
  <PlaneProjection x:Name="HeadsGridProjection" RotationX="0" RotationY="0" RotationZ="0"></PlaneProjection>
</Grid.Projection>

The example below uses 2 grids containing a circle (the coin face) and text "Heads" or "Tails". There are 2 storyboards, the 1st rotates the heads to tails, the 2nd animation tails to heads. The storyboards call each other wheneach one finishes using the Completed event of the storyboard.

The code behind looks like this:

using System;
using System.Collections.Generic;
using System.Linq;
using System.Net;
using System.Windows;
using System.Windows.Controls;
using System.Windows.Documents;
using System.Windows.Input;
using System.Windows.Media;
using System.Windows.Media.Animation;
using System.Windows.Shapes;

namespace _3DCoinFlip
{
    public partial class MainPage : UserControl
    {
        public MainPage()
        {
            InitializeComponent();
        }
      
        private void UserControl_Loaded(object sender, RoutedEventArgs e)
        {
            // Automatically start the 1st storyboard when the page loads
            FlipToTails.Begin();
        }
       
        private void FlipToTails_Completed(object sender, EventArgs e)
        {
            // When the head-->tails animation completes, start the tails-->heads animation
            FlipToHeads.Begin();
        }

        private void FlipToHeads_Completed(object sender, EventArgs e)
        {
            // When the tails-->heads animation completes, start the head-->tails animation
            FlipToTails.Begin();
        }
    }
}

 And the XAML:

<UserControl x:Class="_3DCoinFlip.MainPage"
    xmlns="http://schemas.microsoft.com/winfx/2006/xaml/presentation"
    xmlns:x="http://schemas.microsoft.com/winfx/2006/xaml"
    xmlns:d="http://schemas.microsoft.com/expression/blend/2008" xmlns:mc="http://schemas.openxmlformats.org/markup-compatibility/2006"
    mc:Ignorable="d" d:DesignWidth="640" d:DesignHeight="480"
    Loaded="UserControl_Loaded" >
    <UserControl.Resources>
       
        <Style TargetType="Grid" x:Key="CoinFace">
            <Setter Property="Width" Value="200"/>
            <Setter Property="Height" Value="200"/>
        </Style>

        <Style TargetType="TextBlock" x:Key="CoinText">
            <Setter Property="VerticalAlignment" Value="Center"/>
            <Setter Property="HorizontalAlignment" Value="Center"/>
            <Setter Property="FontSize" Value="48"/>
        </Style>
       

        <Storyboard x:Name="FlipToTails" Completed="FlipToTails_Completed" >
            <!-- heads side -->
            <DoubleAnimationUsingKeyFrames BeginTime="00:00:00"
                                           Storyboard.TargetName="HeadsGridProjection"
                                           Storyboard.TargetProperty="RotationY">
                <SplineDoubleKeyFrame KeyTime="00:00:00" Value="0"/>
                <SplineDoubleKeyFrame KeyTime="00:00:01" Value="90"/>
            </DoubleAnimationUsingKeyFrames>


            <!-- Tails Side -->
            <DoubleAnimationUsingKeyFrames BeginTime="00:00:00"
                                           Storyboard.TargetName="TailsGridProjection"
                                           Storyboard.TargetProperty="RotationY">
                <SplineDoubleKeyFrame KeyTime="00:00:01" Value="270"/>
                <SplineDoubleKeyFrame KeyTime="00:00:02" Value="360"/>
            </DoubleAnimationUsingKeyFrames>

            <DoubleAnimationUsingKeyFrames BeginTime="00:00:00"
                                           Storyboard.TargetName="Tails"
                                           Storyboard.TargetProperty="Opacity">
                <SplineDoubleKeyFrame KeyTime="00:00:00" Value="0"/>
                <SplineDoubleKeyFrame KeyTime="00:00:01" Value="0"/>
                <SplineDoubleKeyFrame KeyTime="00:00:01.01" Value="1"/>
            </DoubleAnimationUsingKeyFrames>
        </Storyboard>


        <Storyboard x:Name="FlipToHeads" Completed="FlipToHeads_Completed">
            <!-- tails side -->
            <DoubleAnimationUsingKeyFrames BeginTime="00:00:00"
                                           Storyboard.TargetName="TailsGridProjection"
                                           Storyboard.TargetProperty="RotationY">
                <SplineDoubleKeyFrame KeyTime="00:00:00" Value="0"/>
                <SplineDoubleKeyFrame KeyTime="00:00:01" Value="90"/>
            </DoubleAnimationUsingKeyFrames>


            <!-- heads Side -->
            <DoubleAnimationUsingKeyFrames BeginTime="00:00:00"
                                           Storyboard.TargetName="HeadsGridProjection"
                                           Storyboard.TargetProperty="RotationY">
                <SplineDoubleKeyFrame KeyTime="00:00:01" Value="270"/>
                <SplineDoubleKeyFrame KeyTime="00:00:02" Value="360"/>
            </DoubleAnimationUsingKeyFrames>

            <DoubleAnimationUsingKeyFrames BeginTime="00:00:00"
                                           Storyboard.TargetName="Heads"
                                           Storyboard.TargetProperty="Opacity">
                <SplineDoubleKeyFrame KeyTime="00:00:00" Value="0"/>
                <SplineDoubleKeyFrame KeyTime="00:00:01" Value="0"/>
                <SplineDoubleKeyFrame KeyTime="00:00:01.01" Value="1"/>
            </DoubleAnimationUsingKeyFrames>
        </Storyboard>
    </UserControl.Resources>

    <Grid x:Name="LayoutRoot">
        <StackPanel>
            <Grid>
                <Grid Name="Heads" Style="{StaticResource CoinFace}">
                    <Grid.Projection>
                        <PlaneProjection x:Name="HeadsGridProjection" RotationX="0" RotationY="0" RotationZ="0"></PlaneProjection>
                    </Grid.Projection>
                    <Ellipse Stretch="Fill" Fill="Silver"/>
                    <TextBlock Style="{StaticResource CoinText}">Heads</TextBlock>
                </Grid>
                <Grid Name="Tails" Style="{StaticResource CoinFace}" Opacity="0">
                    <Grid.Projection>
                        <PlaneProjection x:Name="TailsGridProjection" RotationX="0" RotationY="0" RotationZ="0"></PlaneProjection>
                    </Grid.Projection>
                    <Ellipse Stretch="Fill" Fill="Gold"/>
                    <TextBlock Style="{StaticResource CoinText}">Tails</TextBlock>
                </Grid>
            </Grid>
        </StackPanel>
    </Grid>
</UserControl>


SHARE:

Silverlight 3 - Detecting Network Availability

One of the new SL3 features is the ability to test if there is a network connection currently active. This complements the out of browser experience by letting an app use local (isolated) storage when off-line, and when a network connection becomes available, upload data to a central server.

To be informed when the network changes:

System.Net.NetworkInformation.NetworkChange.NetworkAddressChanged += (sender, e) => txtNetStatus.Text = "Network available: " + System.Net.NetworkInformation.NetworkInterface.GetIsNetworkAvailable().ToString();

This example uses a lambda expression as a shortcut (rather than having a separate method); when the network status changes, we set the text of txtNetStatus to 'Network available: True' or 'Network available: False' depedning on the (boolean) result of GetIsNetworkAvailable().

SHARE: