Processing a Single Azure Cosmos DB Document at a Time With Azure Functions

This is the fifth part in a series of articles.

In previous parts of this series the Azure Function code receives one or more Cosmos DB documents as part of the trigger.

The Azure Functions Cosmos DB trigger uses the change feed from Azure Cosmos to determine when to trigger the function and also what changes to send to the function invocation. If there is only a single updated (or inserted) document then the function will be called and the single document passed to it.

Notice in the following code that the document(s) that need processing are contained in the IReadOnlyList<Document> modifiedDriver collection:

[FunctionName("PizzaDriverLocationUpdated")]
public static async Task Run([CosmosDBTrigger(
    databaseName: "pizza",
    collectionName: "driver",
    ConnectionStringSetting = "pizzaConnection")] IReadOnlyList<Document> modifiedDrivers,            
    ILogger log)
{
    if (modifiedDrivers != null)
    {
        log.LogInformation($"Total modified drivers: {modifiedDrivers.Count}");

        foreach (var modifiedDriver in modifiedDrivers)
        {
            var driverName = modifiedDriver.GetPropertyValue<string>("Name");
            var driverLat = modifiedDriver.GetPropertyValue<double>("Latitude");
            var driverLong = modifiedDriver.GetPropertyValue<double>("Longitude");

            log.LogInformation($"Driver {modifiedDriver.Id} {driverName} was updated (lat,long) {driverLat}, {driverLong}");                    
        }
    }
}

The preceding code just outputs what documents changed to the log/console.

The reason that the foreach loop is required is that the function may receive multiple documents from the change feed.

If you only want to work with a single document per invocation of the function you can restrict the number of documents. To do this the MaxItemsPerInvocation property of the trigger attribute can be set as the following code demonstrates:

[FunctionName("PizzaDriverLocationUpdated")]
public static async Task Run([CosmosDBTrigger(
    databaseName: "pizza",
    collectionName: "driver",
    MaxItemsPerInvocation = 1,
    ConnectionStringSetting = "pizzaConnection")] IReadOnlyList<Document> modifiedDrivers,            
    ILogger log)
{
    if (modifiedDrivers != null)
    {
        log.LogInformation($"Total modified drivers: {modifiedDrivers.Count}");

        foreach (var modifiedDriver in modifiedDrivers)
        {
            var driverName = modifiedDriver.GetPropertyValue<string>("Name");
            var driverLat = modifiedDriver.GetPropertyValue<double>("Latitude");
            var driverLong = modifiedDriver.GetPropertyValue<double>("Longitude");

            log.LogInformation($"Driver {modifiedDriver.Id} {driverName} was updated (lat,long) {driverLat}, {driverLong}");                    
        }
    }
}

Now there will only be one document in the collection, so the function can be simplified to the following (removing the foreach loop):

[FunctionName("PizzaDriverLocationUpdated")]
public static async Task Run([CosmosDBTrigger(
    databaseName: "pizza",
    collectionName: "driver",
    MaxItemsPerInvocation = 1,
    ConnectionStringSetting = "pizzaConnection")] IReadOnlyList<Document> modifiedDrivers,
    ILogger log)
{
    if (modifiedDrivers != null && modifiedDrivers.Any())
    {
        var modifiedDriver = modifiedDrivers[0];

        var driverName = modifiedDriver.GetPropertyValue<string>("Name");
        var driverLat = modifiedDriver.GetPropertyValue<double>("Latitude");
        var driverLong = modifiedDriver.GetPropertyValue<double>("Longitude");

        log.LogInformation($"Driver {modifiedDriver.Id} {driverName} was updated (lat,long) {driverLat}, {driverLong}");                
    }
}

Now if 2 updates are made to the database, the function will execute twice, once per changed document:

Executing 'PizzaDriverLocationUpdated' (Reason='New changes on collection driver at 2019-05-28T05:42:25.2143459Z', Id=06d1e318-ab26-4f9b-ac94-3c95fba2dc5c)
Driver 1 Amrit was updated (lat,long) 31.2, 300.3
Executed 'PizzaDriverLocationUpdated' (Succeeded, Id=06d1e318-ab26-4f9b-ac94-3c95fba2dc5c)
Executing 'PizzaDriverLocationUpdated' (Reason='New changes on collection driver at 2019-05-28T05:42:25.5350736Z', Id=34629f4a-66f4-4bbc-85d6-8c3d8c17ee62)
Driver 2 Sarah was updated (lat,long) 222.1, 31.2
Executed 'PizzaDriverLocationUpdated' (Succeeded, Id=34629f4a-66f4-4bbc-85d6-8c3d8c17ee62)

In the next part of this series we’ll look at how to execute multiple different functions when a document changes.

If you want to fill in the gaps in your C# knowledge be sure to check out my C# Tips and Traps training course from Pluralsight – get started with a free trial.

SHARE:

How To Notify Clients of Cosmos DB Changes with Azure SignalR and Azure Functions

This is the fourth part in a series of articles.

The Cosmos DB Azure Functions trigger can be used in conjunction with the Azure SignalR Service to create real-time notifications of changes made to data in Cosmos DB, all in a serverless way.

Azure Cosmos DB Change Notifications with Azure Functions and SignalR

If you want to learn more about how to setup the SignalR Service, check out this previous article.

In this series we’ve been using the domain of pizza delivery. In this article we’ll see how  updates in Cosmos DB can trigger a notification on an HTML client – you may have seen this if you’ve ordered pizza online where the delivery driver is tracked by GPS on a map.

The first thing to do is set up an Azure SignalR Service in Azure and add the SignalR Service connection string in the local.settings.json file which was covered in this article.

We can now add the negotiate function:

[FunctionName("negotiate")]
public static SignalRConnectionInfo GetDriverLocationUpdatesSignalRInfo(
    [HttpTrigger(AuthorizationLevel.Anonymous, "post")] HttpRequest req,
    [SignalRConnectionInfo(HubName = "driverlocationnotifications")] SignalRConnectionInfo connectionInfo)
{
    return connectionInfo;
}

The preceding code sets the SignalR hub to be used in this example as “driverlocationnotifications”, we’ll use the same hub name in the function that actually sends updates to clients.

The next thing to do is add a function that is triggered when changes are made to the location of pizza delivery drivers (note the trigger will also fire for new documents that are added):

[FunctionName("PizzaDriverLocationUpdated")]
public static async Task Run([CosmosDBTrigger(
    databaseName: "pizza",
    collectionName: "driver",
    ConnectionStringSetting = "pizzaConnection")] IReadOnlyList<Document> modifiedDrivers,
    [SignalR(HubName = "driverlocationnotifications")] IAsyncCollector<SignalRMessage> signalRMessages,
    ILogger log)
{
    if (modifiedDrivers != null)
    {
        log.LogInformation($"Total modified drivers: {modifiedDrivers.Count}");

        foreach (var modifiedDriver in modifiedDrivers)
        {
            var driverName = modifiedDriver.GetPropertyValue<string>("Name");
            var driverLat = modifiedDriver.GetPropertyValue<double>("Latitude");
            var driverLong = modifiedDriver.GetPropertyValue<double>("Longitude");

            log.LogInformation($"Driver {modifiedDriver.Id} {driverName} was updated (lat,long) {driverLat}, {driverLong}");

            var message = new DriverLocationUpdatedMessage
            {
                DriverId = modifiedDriver.Id,
                DriverName = driverName,
                Latitude = driverLat,
                Longitude = driverLong
            };

            await signalRMessages.AddAsync(new SignalRMessage
            {
                Target = "driverLocationUpdated",
                Arguments = new[] { message }
            });
        }
    }
}

The preceding code uses the [CosmosDBTrigger] to fire the function when there are changes made to the “driver” collection in the “pizza” database.

The [SignalR] binding attribute allows outgoing SignalR messages to be sent to connected clients by adding messages to the IAsyncCollector<SignalRMessage> signalRMessages object. Notice that the type of the Cosmos DB trigger is IReadOnlyList<Document>, to get the actual data items of the document we use the GetPropertyValue method, for example to get the driver name: modifiedDriver.GetPropertyValue<string>("Name").

In the HTML, we can connect to the “driverlocationnotifications” SignalR hub, and then get notifications when any driver location changes, in reality we would probably only want to get messages for the driver that is delivering our pizza but for simplicity we won’t worry about it in this demo code.

The following is the HTML to make this work:

<html>

<head>
     <!--Adapted from: https://azure-samples.github.io/signalr-service-quickstart-serverless-chat/demo/chat-v2/ -->

    <title>SignalR Demo</title>
    <link rel="stylesheet" href="https://cdn.jsdelivr.net/npm/bootstrap@4.1.3/dist/css/bootstrap.min.css">

    <style>
        .slide-fade-enter-active, .slide-fade-leave-active {
            transition: all 1s ease;
        }

        .slide-fade-enter, .slide-fade-leave-to {
            height: 0px;
            overflow-y: hidden;
            opacity: 0;
        }
    </style>
</head>

<body>
    <p>&nbsp;</p>
    <div id="app" class="container">
        <h3>Your Pizza Is On Its Way!!</h3>

        <div class="row" v-if="!ready">
            <div class="col-sm">
                <div>Loading...</div>
            </div>
        </div>
        <div v-if="ready">
            <transition-group name="slide-fade" tag="div">
                <div class="row" v-for="driver in drivers" v-bind:key="driver.DriverId">
                    <div class="col-sm">
                        <hr />
                        <div>
                            <div style="display: inline-block; padding-left: 12px;">
                                <div>
                                    <span class="text-info small"><strong>{{ driver.DriverName }}</strong> just changed location:</span>
                                </div>
                                <div>
                                    {{driver.Latitude}},{{driver.Longitude}}
                                </div>
                            </div>
                        </div>
                    </div>
                </div>
            </transition-group>
        </div>
    </div>

    <script src="https://cdn.jsdelivr.net/npm/vue@2.5.17/dist/vue.js"></script>
    <script src="https://cdn.jsdelivr.net/npm/@aspnet/signalr@1.1.2/dist/browser/signalr.js"></script>
    <script src="https://cdn.jsdelivr.net/npm/axios@0.18.0/dist/axios.min.js"></script>

    <script>
        const data = {
          drivers: [],
          ready: false
        };

        const app = new Vue({
          el: '#app',
          data: data,
          methods: {
          }
        });

        const connection = new signalR.HubConnectionBuilder()
          .withUrl('http://localhost:7071/api')
          .configureLogging(signalR.LogLevel.Information)
          .build();

        connection.on('driverLocationUpdated', driverLocationUpdated);
        connection.onclose(() => console.log('disconnected'));

        console.log('connecting...');
        connection.start()
            .then(() => data.ready = true)
            .catch(console.error);

        let counter = 0;

        function driverLocationUpdated(driverLocationUpdatedMessage) {
        driverLocationUpdatedMessage.id = counter++; // vue transitions need an id
        data.drivers.unshift(driverLocationUpdatedMessage);
    }
    </script>
</body>

</html>

Now when changes are made to the documents in the driver collection, the Azure Function will execute and send out Azure SignalR Service messages to clients. In this example we’re just writing out the messages in the page, but you can image the latitude and longitude being used to draw a little car image on top of a map, etc.

If you want to fill in the gaps in your C# knowledge be sure to check out my C# Tips and Traps training course from Pluralsight – get started with a free trial.

SHARE:

Writing Azure Cosmos DB Data from Azure Functions

This is the third part in a series of articles.

In part 2 of this series we saw how to read data from Cosmos DB, in this article we’ll see how to write data to Cosmos DB from an Azure Function.

As with input, output is achieved by the use of the [CosmosDB] binding attribute and as before, the database name, collection name, id, partition, and connection string can be defined.

In part 2 we saw how to use binding expressions to take data from the HTTP querystring and use that to select a document to read in (e.g. by Id). In this article we’ll see how we can do a similar thing when the trigger type is for a storage queue.

The following function is triggered when a message is written to the “update-pizza-driver-location” queue:

[FunctionName("UpdatePizzaDriverLocation")]
[return: CosmosDB(databaseName: "pizza", collectionName: "driver", ConnectionStringSetting = "pizzaConnection", Id = "{Id}", PartitionKey = "{StoreId}")]
public static Driver Run(
    [QueueTrigger("update-pizza-driver-location")] PizzaDriverLocationUpdate locationUpdate,
    [CosmosDB(databaseName: "pizza", collectionName: "driver", ConnectionStringSetting = "pizzaConnection", Id = "{Id}", PartitionKey = "{StoreId}")] Driver driver,            
    ILogger log)
{
    if (driver is null)
    {
        log.LogError($"Driver Id/partition {locationUpdate.Id}/{locationUpdate.StoreId} not found in database.");
        return null;
    }

    driver.Latitude = locationUpdate.NewLat;
    driver.Longitude = locationUpdate.NewLong;

    return driver;
}

The first thing to notice in the preceding function that there are 2 instances of the [CosmosDB] binding attribute, one as the return binding for the method (the output binding to perform the update) and the input binding in the Run method parameter (the input binding to read the current state of the Driver).

Another thing to notice is the use of the {Id} and {StoreId} binding expressions. These expressions assume that the incoming queue message contains JSON properties that match these expressions, for example:

{
    "Id" : "1",
    "StoreId" : "101",
    "NewLat" : 111.2,
    "NewLong" : 3110.3
}

The Driver and PizzaDriverLocationUpdate classes look like the following:

public class PizzaDriverLocationUpdate
{
    public string Id { get; set; }
    public string StoreId { get; set; }
    public double NewLat { get; set; }
    public double NewLong { get; set; }
}


public class Driver
{
    [JsonProperty(PropertyName = "id")]
    public string Id { get; set; }
    public string StoreId { get; set; }
    public string Name { get; set; }
    public double Latitude { get; set; }
    public double Longitude { get; set; }
}

Note in the Driver class, the [JsonProperty(PropertyName = "id")] attribute is mapping Id to id in Cosmos DB.

If you want to write multiple documents from a single function invocation you make use of an IAsyncCollector, for example IAsyncCollector<Driver> drivers and then use drivers.AddAsync(newDriver) method to write multiple documents.

In the next part of this series we’ll see how we can combine Azure Cosmos DB triggers with SignalR to create notifications to clients when data changes.

If you want to fill in the gaps in your C# knowledge be sure to check out my C# Tips and Traps training course from Pluralsight – get started with a free trial.

SHARE:

Reading Azure Cosmos DB Data In Azure Functions

This is the second part in a series of articles.

In addition to triggering a function when Cosmos DB data changes (as we saw in part one) you can also read data in from Cosmos DB when a function executes. The simplest way to do this is to use an input binding.

The [CosmosDB] binding attribute can be used both as an input binding and an output binding. When used as an input binding it allows one or more documents to be retrieved from the database.

When using the attribute there are a number of ways to configure it including:

  • The Cosmos DB database name
  • The collection name
  • The document Id to retrieve
  • The partition key
  • And the connection string app setting

Reading a Single Cosmos DB Document in an Azure Function

The following code shows an Azure Function that is triggered from an HTTP GET request:

[FunctionName("GetDriver")]
public static async Task<IActionResult> Run(
    [HttpTrigger(AuthorizationLevel.Function, "get", Route = null)] HttpRequest req,
    [CosmosDB(databaseName: "pizza",collectionName: "driver", Id = "{Query.id}", PartitionKey = "{Query.storeId}", ConnectionStringSetting = "pizzaConnection")] Driver driver,
    ILogger log)
{
    log.LogInformation("C# HTTP trigger function processed a request.");

    if (driver is null)
    {
        return new NotFoundResult();
    }

    return new OkObjectResult(driver);
}

Notice first the [CosmosDB] binding attribute. The combination of the Id and PartitionKey will determine the Driver object (if any) that will be retrieved. Note the format of these two: {Query.id} and {Query.storeId}.This will look for query string parameters in the incoming HTTP GET called id and storeId, for example: http://localhost:7071/api/GetDriver?id=1&storeId=101

If no document is found, driver will be null.

If the document was found it will be returned as JSON to the caller.

Reading Multiple Cosmos DB Documents in an Azure Function Using SqlQuery

The following function will get the latest 100 drivers (as sorted by the built in timestamp _ts property):

[FunctionName("GetDrivers")]
public static async Task<IActionResult> GetDrivers(
    [HttpTrigger(AuthorizationLevel.Function, "get", Route = null)] HttpRequest req,
    [CosmosDB(databaseName: "pizza", collectionName: "driver", SqlQuery = "SELECT top 100 * FROM driver order by driver._ts desc", ConnectionStringSetting = "pizzaConnection")] IEnumerable<Driver> drivers,
    ILogger log)
{
    log.LogInformation("C# HTTP trigger function processed a request.");

    if (drivers is null)
    {
        return new NotFoundResult();
    }

    foreach (var driver in drivers)
    {
        log.LogInformation(driver.Name);
    }

    return new OkObjectResult(drivers);
}

There’s a couple of things to notice in the preceding code. The first is that instead of a single Driver, the binding now returns IEnumerable<Driver> drivers. Also notice that the binding no longer has Id and PartitionKey.

Reading Multiple Cosmos DB Documents Based on Query String Parameter

A more advanced technique is to bind to an instance of DocumentClient. This allows more fine grained/low level/more specific access of data, such as using a LINQ query to perform the search:

[FunctionName("GetDriversForStore")]
public static async Task<IActionResult> GetDriversForStore(
    [HttpTrigger(AuthorizationLevel.Function, "get", Route = null)] HttpRequest req,
    [CosmosDB( ConnectionStringSetting = "pizzaConnection")] DocumentClient client,
    ILogger log)
{
    log.LogInformation("C# HTTP trigger function processed a request.");
    
    // Validation and error checking omitted for demo purposes
               
    string storeId = req.Query["storeId"]; // read storeId to get driver for from querystring

    Uri driverCollectionUri = UriFactory.CreateDocumentCollectionUri(databaseId: "pizza", collectionId: "driver");

    var options = new FeedOptions { EnableCrossPartitionQuery = true }; // Enable cross partition query

    IDocumentQuery<Driver> query = client.CreateDocumentQuery<Driver>(driverCollectionUri, options)
                                         .Where(driver => driver.StoreId == storeId)
                                         .AsDocumentQuery();

    var driversForStore = new List<Driver>();

    while (query.HasMoreResults)
    {
        foreach (Driver driver in await query.ExecuteNextAsync())
        {
            driversForStore.Add(driver);
        }
    }                       

    return new OkObjectResult(driversForStore);
}

The preceding code returns all drivers that belong to a specific store passed in as a querystring storeId parameter.

In the next part of this series we’ll see how to write data out to Cosmos DB when a function executes.

If you want to fill in the gaps in your C# knowledge be sure to check out my C# Tips and Traps training course from Pluralsight – get started with a free trial.

SHARE:

Getting Started with Azure Cosmos DB and Azure Functions

This is the first part in a series of articles.

Azure Cosmos DB is a “globally distributed, multi-model database service. With a click of a button, Cosmos DB enables you to elastically and independently scale throughput and storage across any number of Azure regions worldwide. You can elastically scale throughput and storage, and take advantage of fast, single-digit-millisecond data access using your favorite API including SQL, MongoDB, Cassandra, Tables, or Gremlin” [Microsoft]

One way to respond to changes in Cosmos is to use Azure Functions. When changes occur (currently limited to inserts and updates, e.g. not deletions ) the Function can be notified and executes.

Azure Function Cosmos DB triggers under the hood make use of the Azure Cosmos DB change feed to know when to execute functions.

Installing the Azure Cosmos Emulator

You can use the Azure Cosmos Emulator to get started locally without even needing an Azure subscription.

Once the emulator is downloaded and installed on your development PC (a Docker version is also available) you can start the  emulator from the start menu.

When running you can see the icon in the Windows taskbar notification area and it will pop up a browser window pointing to https://localhost:8081/_explorer/index.html as the following screenshot shows:

Azure Cosmos Emulator portal

Notice in the preceding screenshot the Primary Connection String, you will need to copy this for use in the local app settings later.

Creating an Azure Function Triggered from Cosmos DB

Once you have created an Azure Function project in Visual Studio, you need to add the Microsoft.Azure.WebJobs.Extensions.CosmosDB NuGet package to get access to the .NET C# bindings.

Now the package is installed (and with an up to date installation of Visual Studio) you can right click the Azure Functions project and choose Add –> New Azure Function…

Give the function a name and for the trigger type choose Cosmos - this will create a boiler plate function like the following:

public static class PizzaDriverLocationUpdated
{
    [FunctionName("PizzaDriverLocationUpdated")]
    public static void Run([CosmosDBTrigger(
        databaseName: "databaseName",
        collectionName: "collectionName",
        ConnectionStringSetting = "",
        LeaseCollectionName = "leases")]IReadOnlyList<Document> input, ILogger log)
    {
        if (input != null && input.Count > 0)
        {
            log.LogInformation("Documents modified " + input.Count);
            log.LogInformation("First document Id " + input[0].Id);
        }
    }
}

The preceding code uses the [CosmosDBTrigger] attribute to tell this function to execute when there are changes as specified by the following attribute parameters/properties:

  • databaseName - Azure Cosmos DB database with the monitored collection
  • collectionName – Collection being monitored for changes
  • ConnectionStringSetting – App setting name containing the connection string to the Azure Cosmos DB being monitored
  • LeaseCollectionName - name of the collection used to store leases, defaults to “leases” if not specified

The LeaseCollectionName is required by the trigger to store leases over Cosmos DB partitions, one thing to note: “If multiple functions are configured to use a Cosmos DB trigger for the same collection, each of the functions should use a dedicated lease collection or specify a different LeaseCollectionPrefix for each function. Otherwise, only one of the functions will be triggered” [Microsoft]

How to Create a Database and Collection in the Azure Cosmos Emulator

In the emulator portal in the browser, click Explorer.This will allow you to create collections in the emulator.

Click the New Collection button and enter the following:

  • Database id: pizza
  • Collection Id: driverLocation
  • Partition key: /storeId

Creating a new collection in the Azure Cosmos DB Emulator

Save this new collection.

Configuring an Azure Function Cosmos DB Trigger

Modify the function that was created earlier to be as follows:

public static class PizzaDriverLocationUpdated
{
    [FunctionName("PizzaDriverLocationUpdated")]
    public static void Run([CosmosDBTrigger(
        databaseName: "pizza",
        collectionName: "driverLocation",
        ConnectionStringSetting = "pizzaConnection")] IReadOnlyList<Document> input,
        ILogger log)
    {
        if (input != null && input.Count > 0)
        {
            log.LogInformation("Documents modified " + input.Count);
            log.LogInformation("First document Id " + input[0].Id);
        }
    }
}

Notice in the preceding code that the databaseName and collectionName settings match what we just created in the emulator.

The ConnectionStringSetting is set to “pizzaConnection” – this needs to be in the function settings, in the case of local development in the local.settings.json file:

{
  "IsEncrypted": false,
  "Values": {
    "AzureWebJobsStorage": "UseDevelopmentStorage=true",
    "FUNCTIONS_WORKER_RUNTIME": "dotnet",
    "pizzaConnection": "AccountEndpoint=https://localhost:8081/;AccountKey=C2y6yDjf5/R+ob0N8A7Cgv30VRDJIWEHLM+4QDU5DE2nQ9nDuVTqobD4b8mGGyPMbIZnqyMsEcaGQy67XIw/Jw=="
  },
  "Host": {
    "LocalHttpPort": 7071,
    "CORS": "http://localhost:3872",
    "CORSCredentials": true
  }
}

Notice in the preceding settings, the value for the pizzaConnection item is the Primary Connection String copied from the Azure Cosmos Emulator.

Testing the Function Locally

Now that the function code is configured and the database and collection exist in the emulator, hit F5 in Visual Studio (or click Run) and the local functions runtime will start.

Once the runtime has started, head back to the Cosmos Emulator in the browser, click on Pizza –> driverLocation –> Documents and click the New Document button.

Creating a new document in the Cosmos DB emulator

Add the following:

{
    "id": "1",
    "storeId": 42,
    "name": "Sarah",
    "lat" : 52,
    "long": 2
}

And click Save.

Head back to the locally running functions runtime window and you will see the function has noticed this new document and executed:

Executing 'PizzaDriverLocationUpdated' (Reason='New changes on collection driverLocation at 2019-05-10T04:10:29.9913171Z', Id=203ae791-c7d4-4270-ac6b-501f313c3805)
Documents modified 1
First document Id 1
Executed 'PizzaDriverLocationUpdated' (Succeeded, Id=203ae791-c7d4-4270-ac6b-501f313c3805)

If you head back to the emulator, modify the document (e.g. change the name to “Amrit”) and click Update, the function will trigger a second time:

Executing 'PizzaDriverLocationUpdated' (Reason='New changes on collection driverLocation at 2019-05-10T04:13:00.8233214Z', Id=778caddd-9f19-42fa-9d9d-6c5dd5892a25)
Documents modified 1
First document Id 1
Executed 'PizzaDriverLocationUpdated' (Succeeded, Id=778caddd-9f19-42fa-9d9d-6c5dd5892a25)

If you want to fill in the gaps in your C# knowledge be sure to check out my C# Tips and Traps training course from Pluralsight – get started with a free trial.

SHARE:

Returning HTTP Status Codes from Azure Functions

(This post refers to Azure Functions v2)

When creating HTTP-triggered Azure Functions there are a number of ways to indicate results back to the calling client.

Returning HTTP Status Codes Manually

To return a specific status code to the client you can create an instance of one of the …Result classes and return that from the function body.

The following example returns an instance of an OkResult or a BadRequestResult:

[FunctionName("AddActor1")]
public static async Task<IActionResult> AddActor1(
    [HttpTrigger(AuthorizationLevel.Function, "post")] HttpRequest req,
    ILogger log)
{
    log.LogInformation("C# HTTP trigger function processed a request.");

    string requestBody = await new StreamReader(req.Body).ReadToEndAsync();
    dynamic data = JsonConvert.DeserializeObject(requestBody);

    string name = data.actorName; // get name from dynamic/JSON object

    if (name == null)
    {
        // Return a 400 bad request  result to the client
        return new BadRequestResult();
    }

    // Do some processing
    char firstLetter = name[0];

    // Return a 200 OK to the client
    return new OkResult();                
}

If you wanted to provide additional success/failure information you could use the OkObjectResult and BadRequestObjectResult classes instead, these allow you to provide additional contextual information to the client:

[FunctionName("AddActor2")]
public static async Task<IActionResult> AddActor2(
    [HttpTrigger(AuthorizationLevel.Function, "post")] HttpRequest req,
    ILogger log)
{
    log.LogInformation("C# HTTP trigger function processed a request.");

    string requestBody = await new StreamReader(req.Body).ReadToEndAsync();
    dynamic data = JsonConvert.DeserializeObject(requestBody);

    string name = data.actorName; // get name from dynamic/JSON object

    if (name == null)
    {
        // Return a 400 bad request result to the client with additional information
        return new BadRequestObjectResult("Please pass an actorName in the request body");
    }

    // Do some processing
    char firstLetter = name[0];

    // Return a 200 OK to the client with additional information
    return new OkObjectResult($"Actor {name} was added");
}

Automatically Returning Status Codes

In addition to manually returning status code instances, you can let the functions runtime take care of this for you.

For example, the following code will automatically return a “204 no content” if the function executes without throwing an exception, or a “500 internal server error” if an exception was thrown:

[FunctionName("AddActor3")]
public static async Task AddActor3(
    [HttpTrigger(AuthorizationLevel.Function, "post")] HttpRequest req,
    ILogger log)
{
    log.LogInformation("C# HTTP trigger function processed a request.");

    string requestBody = await new StreamReader(req.Body).ReadToEndAsync();
    dynamic data = JsonConvert.DeserializeObject(requestBody);

    string name = data.actorName; // get name from dynamic/JSON object

    // Do some processing
    char firstLetter = name[0]; // 500 internal server error if name is null

    // Auto return a 204 no content if no exception was thrown
}

In the preceding code, if the client fails to provide a actorName in the JSON, rather then getting a more helpful “400 bad request” (with optional additional message), they instead get a less useful “500 internal server error” status code and they have no idea what may have gone wrong or how to resolve it.

In this way, automatic status codes can be helpful if you want to write less code or perhaps use the return value of the function in a binding as in the following example:

[FunctionName("AddActor4")]
[return: Queue("new-actor-first-letter")]
public static async Task<string> AddActor4(
    [HttpTrigger(AuthorizationLevel.Function, "post")] HttpRequest req,
    ILogger log)
{
    log.LogInformation("C# HTTP trigger function processed a request.");

    string requestBody = await new StreamReader(req.Body).ReadToEndAsync();
    dynamic data = JsonConvert.DeserializeObject(requestBody);

    string name = data.actorName;

    return name.Substring(0,1); // add a new message to the queue containing the first letter of the name
}

Once again, the preceding function will return a 500 if there is an exception (e.g. actorName not provided in JSON) but will return a “200 OK” if no exception occurs (rather than the “204 no content” in the earlier example).

If you want to fill in the gaps in your C# knowledge be sure to check out my C# Tips and Traps training course from Pluralsight – get started with a free trial.

SHARE:

Different Ways to Parse Http Request Data in Http-triggered Azure Functions

(This post refers to Azure Functions v2)

There are different ways to access both the request data and also request metadata when a HTTP-triggered Azure Function is executed.

Getting Query String Data in Azure Functions

Suppose we have the following class (e.g. in table storage):

public class PhotoMetadata
{
    public string PartitionKey { get; set; }
    public string RowKey { get; set; }
    public string FileName { get; set; }
    public string Keywords { get; set; }
}

We could write an Azure Function triggered by a HTTP GET that returns an item from a database by a querystring parameter called “id”:

[FunctionName("GetPhotoMetadata")]
public static IActionResult GetPhotoMetadata(
    [HttpTrigger(AuthorizationLevel.Function, "get")] HttpRequest req,
    ILogger log)
{
    log.LogInformation("C# HTTP trigger function processed a request.");

    string id = req.Query["id"];

    if (string.IsNullOrWhiteSpace(id))
    {
        return new NotFoundResult();
    }

    PhotoMetadata metadata = LoadFromDatabase(id);

    return new OkObjectResult(metadata);
}

In the preceding code, to access querystring parameters use req.Query and specify the key you are looking for, in this example “id”.

If there is no value in the incoming request, id will be null and we return a NotFoundResult (404).

Getting HTTP POST JSON Request Data in Azure Functions

When it comes to accessing POSTed data, there are a number of options.

Manually Convert JSON Request Strings

The first option is to take control of the process at a lower level and read the posted data from the request body and parse the JSON into a dynamic C# object. [If you’re not familiar with dynamic C# check out my Dynamic C# Fundamentals Pluralsight course]

First we define a model that will represent the posted data (we don’t want to use the PhotoMetadata class as we don’t want clients specifying partition and row keys):

public class PhotoMetadataAdditionRequest
{
    public string FileName { get; set; }
    public string Keywords { get; set; }
}

Next we can write a function that will parse this incoming data:

[FunctionName("AddPhotoMetadata")]
public static async Task<IActionResult> AddPhotoMetadata(
    [HttpTrigger(AuthorizationLevel.Function, "post")] HttpRequest req,
    ILogger log)
{
    log.LogInformation("C# HTTP trigger function processed a request.");


    log.LogInformation("You can get additional information about the request such as:");
    log.LogInformation($" length : {req.ContentLength}");
    log.LogInformation($" type   : {req.ContentType}");
    log.LogInformation($" https  : {req.IsHttps}");
    log.LogInformation($" host   : {req.Host}");


    // read the contents of the posted data into a string
    string requestBody = await new StreamReader(req.Body).ReadToEndAsync();

    // use Json.NET to deserialize the posted JSON into a C# dynamic object
    dynamic data = JsonConvert.DeserializeObject(requestBody);

    // data validation omitted for demo purposes

    // extract data from the dynamic object into strongly typed object
    PhotoMetadata metadata = new PhotoMetadata
    {
        FileName = data.fileName, // notice the camel case (lowercase f)
        PartitionKey = "landscapes",
        RowKey = Guid.NewGuid().ToString(),
        Keywords = data.keywords // notice the camel case (lowercase k)
    };

    SaveToDatabase(metadata);

    return new OkObjectResult(metadata.RowKey);
}

Notice in the preceding code that you can also access information about the request such as req.ContentLength. Also note the lowercase f and k in data.fileName and data.keywords.

We can post the following JSON to the function:

{
    "fileName": "IMG0382435.jpg",
    "keywords": "landscape, sky, sunset"
}

Automatically Bind to Strongly Types POCOs in Azure HTTP Functions

You can also let the runtime auto-convert the POSTed JSON into a specified C# type:

[FunctionName("AddPhotoMetadata")]
public static IActionResult AddPhotoMetadata(
    [HttpTrigger(AuthorizationLevel.Function, "post")] PhotoMetadataAdditionRequest metadataAdditionRequest,
    ILogger log)
{
    log.LogInformation("C# HTTP trigger function processed a request.");

    log.LogInformation($" FileName : {metadataAdditionRequest.FileName}");
    log.LogInformation($" Keywords : { metadataAdditionRequest.Keywords}");

    PhotoMetadata metadata = new PhotoMetadata
    {
        FileName = metadataAdditionRequest.FileName,
        PartitionKey = "landscapes",
        RowKey = Guid.NewGuid().ToString(),
        Keywords = metadataAdditionRequest.Keywords
    };

    SaveToDatabase(metadata);

    return new OkObjectResult(metadata.RowKey);
}

In the preceding code, instead of binding to a HttpRequest object,  we bind to the PhotoMetadataAdditionRequest. Behind the scenes the JSON will be automatically deserialized into a PhotoMetadataAdditionRequest object.

Note that if you have malformed JSON you may get errors. For example if the “fileName” item in the JSON was misspelt as “file” then the FileName property of the PhotoMetadata would end up being set to null but the function body would still execute. If you had an int in the POCO but the POSTed JSON had a string (e.g. “hello”) instead of a number, then the runtime cannot bind a “hello” to an int – in this case your function body code will not even execute and you get an error from the runtime such as: “System.Private.CoreLib: Exception while executing function: AddPhotoMetadata. Microsoft.Azure.WebJobs.Host: Exception binding parameter 'metadataAdditionRequest'. System.Private.CoreLib: Input string was not in a correct format.” (and a 500 will status be returned to the client).

If you were handling things at a lower level (e.g. with the dynamic approach) you could perhaps provide a default value, do some extra logging, etc.

Accessing HTTP Request Metadata When Auto-binding to POCOs

If you want to do automatic binding and also want to get request metadata, you can simply add an extra parameter of type HttpRequest:

[FunctionName("AddPhotoMetadata")]
public static IActionResult AddPhotoMetadata(
    [HttpTrigger(AuthorizationLevel.Function, "post")] PhotoMetadataAdditionRequest metadataAdditionRequest,
    HttpRequest req,
    ILogger log)
{
    log.LogInformation("C# HTTP trigger function processed a request.");

    log.LogInformation("You can get additional information about the request such as:");
    log.LogInformation($" length : {req.ContentLength}");
    log.LogInformation($" type   : {req.ContentType}");
    log.LogInformation($" https  : {req.IsHttps}");
    log.LogInformation($" host   : {req.Host}");

    log.LogInformation($" FileName : {metadataAdditionRequest.FileName}");
    log.LogInformation($" Keywords : { metadataAdditionRequest.Keywords}");

    PhotoMetadata metadata = new PhotoMetadata
    {
        FileName = metadataAdditionRequest.FileName,
        PartitionKey = "landscapes",
        RowKey = Guid.NewGuid().ToString(),
        Keywords = metadataAdditionRequest.Keywords
    };

    SaveToDatabase(metadata);

    return new OkObjectResult(metadata.RowKey);
}

Posting Form Data to Azure Functions

In addition to POSTing JSON content to an Azure Function, you can also POST form data and access the HttpRequest.Form property:

[FunctionName("AddPhotoMetadata")]
public static IActionResult AddPhotoMetadata(
    [HttpTrigger(AuthorizationLevel.Function, "post")] HttpRequest req,
    ILogger log)
{
    log.LogInformation("C# HTTP trigger function processed a request.");

    log.LogInformation("You can get additional information about the request such as:");
    log.LogInformation($" length : {req.ContentLength}");
    log.LogInformation($" type   : {req.ContentType}");
    log.LogInformation($" https  : {req.IsHttps}");
    log.LogInformation($" host   : {req.Host}");

    PhotoMetadata metadata = new PhotoMetadata
    {
        FileName = req.Form["fileName"], // access form data
        PartitionKey = "landscapes",
        RowKey = Guid.NewGuid().ToString(),
        Keywords = req.Form["keywords"]  // access form data
    };

    SaveToDatabase(metadata);

    return new OkObjectResult(metadata.RowKey);
}

If you want to fill in the gaps in your C# knowledge be sure to check out my C# Tips and Traps training course from Pluralsight – get started with a free trial.

SHARE:

Using the Azure SignalR Service Bindings in Azure Functions to Create Real-time Serverless Applications

The Azure SignalR Service is a serverless offering from Microsoft to facilitate real-time communications without having to manage the infrastructure yourself.

SignalR itself has been around for a while, now the hosted/serverless version makes it even easier to consume.

There are also Azure Functions bindings available that make it easy to integrate SignalR with Azure Functions and end clients.

This means that any Azure Function with any trigger type (e.g. Azure Cosmos DB changes, queue messages, HTTP requests,  blob triggers, etc.) can push out a notification to clients via Azure SignalR Service.

In this article we’ll build a simple example that simulates the “someone in Austin just bought a Surface Laptop” kind of messages that you see on some shopping websites.
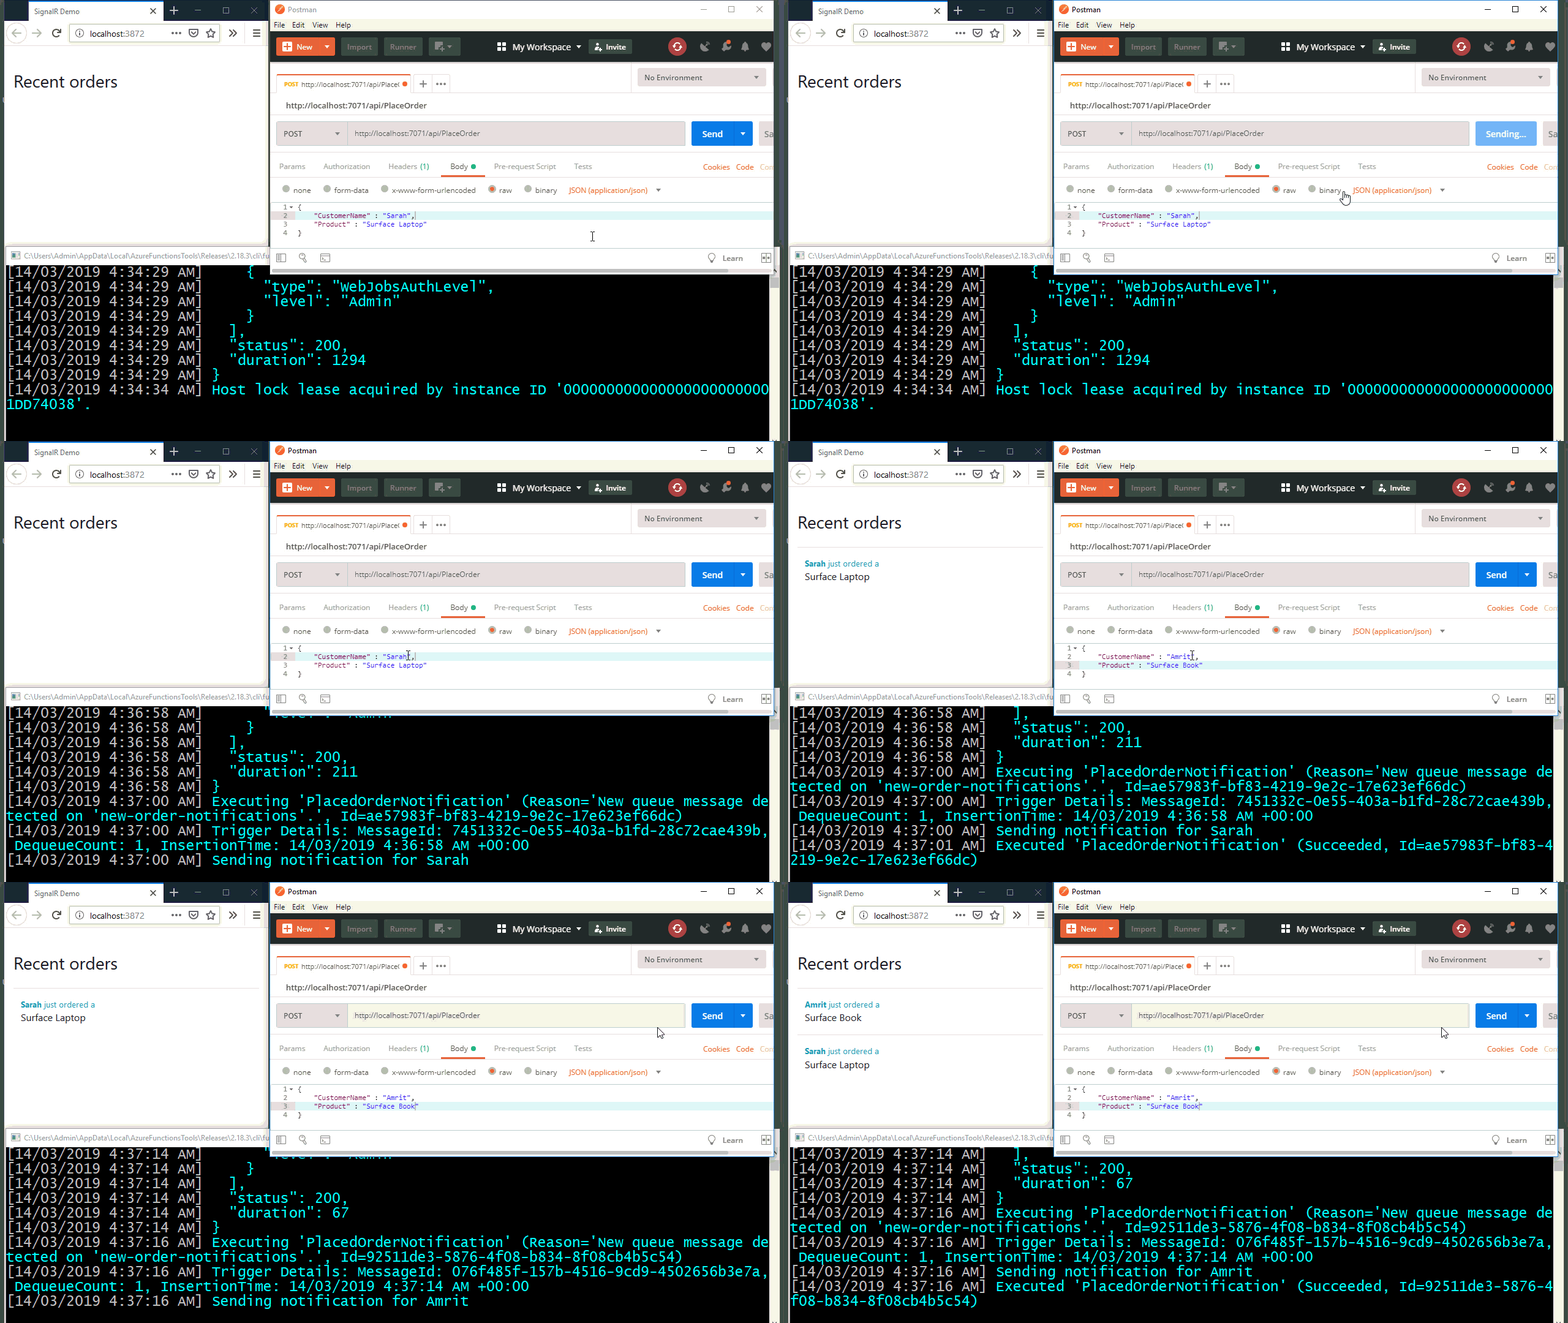
Azure SignalR Service Demo

Creating an Azure SignalR Service Instance

After logging into the Azure Portal, create a new SignalR Service instance (search for “SignalR Service”) – you can currently choose a free pricing tier.

Give the new instance a name, in this example the  instance was called “dctdemosorderplaced”. Once you’ve filled out the info for the new instance (such as resource group and  location) hit the create button and wait for Azure to create the new instance.

Once the instance has been created, open it and head into the settings and change the service mode to Serverless and save the changes, as the following screenshot shows:
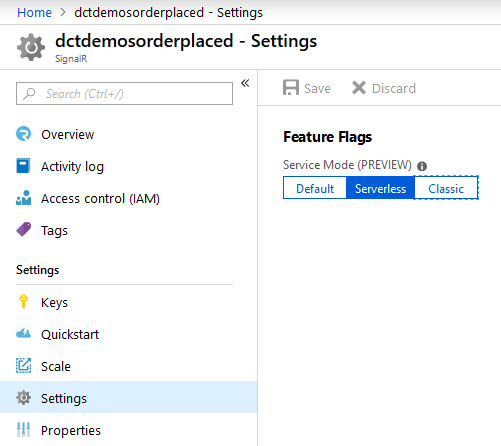
Setting SignalR Service to serverless mode

You will need to copy the connection string to be used in the function app later, you can get this from the Keys tab – copy the Primary connection string as shown in the following screenshot:
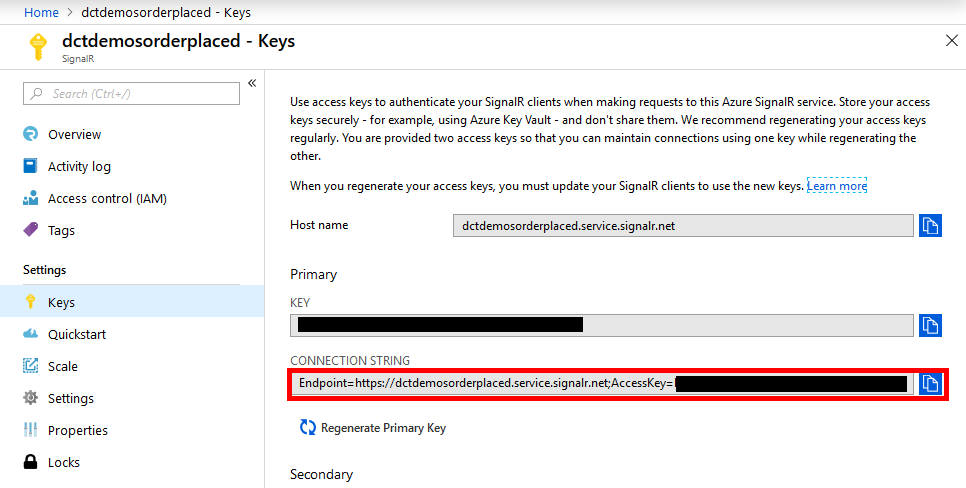
image

Creating the Azure Functions App

In Visual Studio (or Code) create a new Azure Functions project.

Open the local.settings.json file and make the following changes:

{
  "IsEncrypted": false,
  "Values": {
    "AzureWebJobsStorage": "UseDevelopmentStorage=true",
    "FUNCTIONS_WORKER_RUNTIME": "dotnet",
    "AzureSignalRConnectionString": "PASTE YOUR SIGNALR SERVICE CONNECTION STRING HERE"
  },
  "Host": {
    "LocalHttpPort": 7071,
    "CORS": "http://localhost:3872",
    "CORSCredentials": true
  }
}

In the preceding code notice 2 things:

  1. The AzureSignalRConnectionString setting: paste your connection string here
  2. The CORS entries to configure the local environment (http://localhost:3872 is whatever local IIS Express port you will run the test website from)

Add a couple of classes to represent an incoming order and an order stored in table storage (we could have also use Cosmos DB or another storage mechanism – it isn’t really relevant to the SignalR demo):

public class OrderPlacement
{
    public string CustomerName { get; set; }
    public string Product { get; set; }
}


// Simplified for demo purposes
public class Order
{
    public string PartitionKey { get; set; }
    public string RowKey { get; set; }
    public string CustomerName { get; set; }
    public string Product { get; set; }
}

We can now add a function that will allow a new order to be placed:

public static class PlaceOrder
{
    [FunctionName("PlaceOrder")]
    public static async Task<IActionResult> Run(
        [HttpTrigger(AuthorizationLevel.Function, "post")] OrderPlacement orderPlacement,
        [Table("Orders")] IAsyncCollector<Order> orders, // could use cosmos db etc.
        [Queue("new-order-notifications")] IAsyncCollector<OrderPlacement> notifications,
        ILogger log)
    {
        await orders.AddAsync(new Order
        {
            PartitionKey = "US",
            RowKey = Guid.NewGuid().ToString(),
            CustomerName = orderPlacement.CustomerName,
            Product = orderPlacement.Product
        });

        await notifications.AddAsync(orderPlacement);

        return new OkResult();
    }
}

The preceding function allows a new OrderPlacement to be HTTP POSTed to the function. The function saves it in table storage and also adds it to a storage queue.

Creating The Azure Functions with the SignalR Bindings

The first SignalR-related function is the function that a client calls to get itself wired-up to the the SignalR service in the cloud:

[FunctionName("negotiate")]
public static SignalRConnectionInfo GetOrderNotificationsSignalRInfo(
    [HttpTrigger(AuthorizationLevel.Anonymous, "post")] HttpRequest req,
    [SignalRConnectionInfo(HubName = "notifications")] SignalRConnectionInfo connectionInfo)
{
    return connectionInfo;
}

This function will be automatically called from the SignalR client code as we’ll see later in this article. Notice the function returns a SignalRConnectionInfo object to the client. This data contains the SignalR URL and an access token which the client can use. Also notice that the SignalRConnectionInfo binding allows the SignalR hub name to be specified, in this case “notifications”.

Now the client can negotiate a connection to the Azure SignalR Service via our Function App.

Now the client can get itself wired-up, we need to push some data to the client:

[FunctionName("PlacedOrderNotification")]
public static async Task Run(
    [QueueTrigger("new-order-notifications")] OrderPlacement orderPlacement,
    [SignalR(HubName = "notifications")] IAsyncCollector<SignalRMessage> signalRMessages,
    ILogger log)
{
    log.LogInformation($"Sending notification for {orderPlacement.CustomerName}");

    await signalRMessages.AddAsync(
        new SignalRMessage
        {
            Target = "productOrdered",
            Arguments = new[] { orderPlacement }
        });
}

The preceding function is triggered from the queue (“new-order-notifications”) that the initial HTTP function wrote to, but you can send SignalR messages from any triggered function.

Notice the [SignalR(HubName = "notifications")] binding specifies the same hub name as in the negotiate function.

To send notifications, you can simply add one or more SignalRMessage messages to the IAsyncCollector<SignalRMessage> In this function, the arguments contain the OrderPlacement object. The client will then be ale to access the customer name and product and display it on the website as a notification.

Creating an Azure SignalR Service JavaScript Client

Create a new empty ASP.NET Core project and add a default.html file under wwwroot. This example does not require any server-side code (controllers, etc.) in the demo web site, so a simple static HTML file is sufficient.

In the startup.cs configure default and static files:

public void Configure(IApplicationBuilder app, IHostingEnvironment env)
{
    if (env.IsDevelopment())
    {
        app.UseDeveloperExceptionPage();
    }

    app.UseDefaultFiles();
    app.UseStaticFiles();
}

Add the following content to the default.html file:

<html>

<head>
     <!--Adapted (aka hacked) from: https://azure-samples.github.io/signalr-service-quickstart-serverless-chat/demo/chat-v2/ -->

    <title>SignalR Demo</title>
    <link rel="stylesheet" href="https://cdn.jsdelivr.net/npm/bootstrap@4.1.3/dist/css/bootstrap.min.css">

    <style>
        .slide-fade-enter-active, .slide-fade-leave-active {
            transition: all 1s ease;
        }

        .slide-fade-enter, .slide-fade-leave-to {
            height: 0px;
            overflow-y: hidden;
            opacity: 0;
        }
    </style>
</head>

<body>
    <p>&nbsp;</p>
    <div id="app" class="container">
        <h3>Recent orders</h3>

        <div class="row" v-if="!ready">
            <div class="col-sm">
                <div>Loading...</div>
            </div>
        </div>
        <div v-if="ready">
            <transition-group name="slide-fade" tag="div">
                <div class="row" v-for="order in orders" v-bind:key="order.id">
                    <div class="col-sm">
                        <hr />
                        <div>
                            <div style="display: inline-block; padding-left: 12px;">
                                <div>
                                    <span class="text-info small"><strong>{{ order.CustomerName }}</strong> just ordered a</span>
                                </div>
                                <div>
                                    {{ order.Product }}
                                </div>
                            </div>
                        </div>
                    </div>
                </div>
            </transition-group>
        </div>
    </div>

    <script src="https://cdn.jsdelivr.net/npm/vue@2.5.17/dist/vue.js"></script>
    <script src="https://cdn.jsdelivr.net/npm/@aspnet/signalr@1.1.2/dist/browser/signalr.js"></script>
    <script src="https://cdn.jsdelivr.net/npm/axios@0.18.0/dist/axios.min.js"></script>

    <script>
        const data = {
          orders: [],
          ready: false
        };

        const app = new Vue({
          el: '#app',
          data: data,
          methods: {
          }
        });

        const connection = new signalR.HubConnectionBuilder()
          .withUrl('http://localhost:7071/api')
          .configureLogging(signalR.LogLevel.Information)
          .build();

        connection.on('productOrdered', productOrdered);
        connection.onclose(() => console.log('disconnected'));

        console.log('connecting...');
        connection.start()
            .then(() => data.ready = true)
            .catch(console.error);

        let counter = 0;

        function productOrdered(orderPlacement) {
        orderPlacement.id = counter++; // vue transitions need an id
        data.orders.unshift(orderPlacement);
    }
    </script>
</body>

</html>

The .withUrl('http://localhost:7071/api') line is the root of your locally running Azure Function development runtime environment.

When this page loads, the negotiate function will be called in the Function App and will return the Azure SignalR Service connection details so the client can connect to the hub in the cloud and send/receive messages (in this example we are just receiving messages in the JavaScript client).

Running the Demo Application

Right-click the solution in Visual Studio and select “Set Startup Projects…” and choose Multiple startup projects and set the Function App project to Start and the ASP.NET core project to Start without debugging. This just means you can hit F5 and both projects will run.

Once both projects are running you should be able to post some JSON to the PlaceOrder function HTTP endpoint (for example using Postman) containing the CustomerName and Product:

{
    "CustomerName" : "Amrit",
    "Product" : "Surface Book"
}

This will save the order to table storage and add a message to the queue.

The queue-triggered function will pick up this message an send a notification to the client and you should then see “Amrit just ordered a Surface Book” appear on the web site.

Note that this demo application allows anonymous/unauthenticated clients to access the functions and the SignalR Service, in a real-work production app you should ensure you secure the entire system appropriately – see docs for more info.

You can find this entire sample app on GitHub.

If you want to fill in the gaps in your C# knowledge be sure to check out my C# Tips and Traps training course from Pluralsight – get started with a free trial.

SHARE:

Testing EventGridTrigger Azure Functions Locally (Without Using ngrok)

(This post refers to Azure Functions v2)

One way to test Azure Functions that use Event Grid triggers is to run the Function App locally and then get Azure in the cloud to invoke the function running on the local machine. As an example, suppose you want to use Event Grid to improve the reliability and responsiveness of Blob Storage processing. To do this the documentation suggests the use of ngrok. Now when a blob is added to a container in the cloud, the locally running function on the dev machine will be invoked via ngrok.

There is a somewhat simpler solution that allows you to invoke the Event Grid triggered function locally.

This approach bypasses Event Grid completely, so it is not a substitute for proper end-to-end testing, it’s more a development-time testing & debugging tool.

Manually Running Non HTTP-Triggered Azure Functions

You can manually trigger a non HTTP-triggered function (such as a timer triggered or Event Grid triggered function) via a special HTTP endpoint.

The endpoint is of the format: {host}/admin/functions/{function name}

For example, take the following function (which was also used in the post Improving Azure Functions Blob Trigger Performance and Reliability - Part 3: Using Event Grid to Respond to New Blobs):

public static class ProcessFoodBlobsEventGrid
{
    private static readonly string[] _meats = { "steak", "chicken", "venison" };

    [FunctionName("ProcessFoodBlobsEventGrid")]
    public static void Run(
     [EventGridTrigger]EventGridEvent blobCreatedEvent,
     [Blob("{data.url}")] string foods, // assumes small blob size so using string not stream
     [Blob("{data.url}.vegetarian")] out string vegetarian,
     [Blob("{data.url}.nonvegetarian")] out string nonVegetarian,
     ILogger log)
    {
        log.LogInformation("Processing a blob created event");

        StorageBlobCreatedEventData createdEvent = ((JObject)blobCreatedEvent.Data).ToObject<StorageBlobCreatedEventData>();

        log.LogInformation($"Blob: {createdEvent.Url}");
        log.LogInformation($"Api operation: {createdEvent.Api}");

        vegetarian = null;
        nonVegetarian = null;

        string[] foodLines = foods.Split(new[] { "\r\n", "\n" }, StringSplitOptions.RemoveEmptyEntries);


        foreach (var food in foodLines)
        {
            var isMeat = _meats.Contains(food);

            if (isMeat)
            {
                nonVegetarian += food + Environment.NewLine;
            }
            else
            {
                vegetarian += food + Environment.NewLine;
            }
        }
    }
}

The preceding function when running locally in development would have the special URL: http://localhost:7071/admin/functions/ProcessFoodBlobsEventGrid

If you had a timer-triggered function called HerdCats that you wanted to manually invoke (so you didn’t have to wait for the next timed invocation) the special URL would be:http://localhost:7071/admin/functions/HerdCats

Note: when running locally in development you do not have to authenticate. If you wanted to manually invoke a deployed function in Azure, you need to provide an x-functions-key header that contains the function master key.

Manually Invoking an Event Grid Triggered Azure Function

When using the special URL to invoke a function, you can also provide data to be passed to the function. The type of data passed will depend on the trigger type of the function that you are invoking.

To provide data to the function, a JSON payload can be posted to the special URL. The data that is passed to the function is contained in a JSON property called “input”:

{
    "input": "trigger data goes here"
}

If the Event Grid triggered function will be invoked by a new blob event, the contents of this input property must match the event schema for an Azure Blob Storage event.

An example of event JSON (taken from the Microsoft documentation):

[{
  "topic": "/subscriptions/{subscription-id}/resourceGroups/Storage/providers/Microsoft.Storage/storageAccounts/xstoretestaccount",
  "subject": "/blobServices/default/containers/testcontainer/blobs/testfile.txt",
  "eventType": "Microsoft.Storage.BlobCreated",
  "eventTime": "2017-06-26T18:41:00.9584103Z",
  "id": "831e1650-001e-001b-66ab-eeb76e069631",
  "data": {
    "api": "PutBlockList",
    "clientRequestId": "6d79dbfb-0e37-4fc4-981f-442c9ca65760",
    "requestId": "831e1650-001e-001b-66ab-eeb76e000000",
    "eTag": "0x8D4BCC2E4835CD0",
    "contentType": "text/plain",
    "contentLength": 524288,
    "blobType": "BlockBlob",
    "url": "https://example.blob.core.windows.net/testcontainer/testfile.txt",
    "sequencer": "00000000000004420000000000028963",
    "storageDiagnostics": {
      "batchId": "b68529f3-68cd-4744-baa4-3c0498ec19f0"
    }
  },
  "dataVersion": "",
  "metadataVersion": "1"
}]

When testing the function outlined earlier, the first thing to do is ensure that there is a blob in the local blob container that will be read by the function by way of the blob input binding: [Blob("{data.url}")] string foods.

For example, in the Storage Emulator a blob called in.txt can be uploaded to the food-in container.

Now the new blob event data JSON needs to be modified, specifically the data.url property needs to contain the URL to the local blob: http://127.0.0.1:10000/devstoreaccount1/food-in/in.txt

A modified version with updated data.url would be as follows:

[{
  "topic": "/subscriptions/{subscription-id}/resourceGroups/Storage/providers/Microsoft.Storage/storageAccounts/xstoretestaccount",
  "subject": "/blobServices/default/containers/testcontainer/blobs/testfile.txt",
  "eventType": "Microsoft.Storage.BlobCreated",
  "eventTime": "2017-06-26T18:41:00.9584103Z",
  "id": "831e1650-001e-001b-66ab-eeb76e069631",
  "data": {
    "api": "PutBlockList",
    "clientRequestId": "6d79dbfb-0e37-4fc4-981f-442c9ca65760",
    "requestId": "831e1650-001e-001b-66ab-eeb76e000000",
    "eTag": "0x8D4BCC2E4835CD0",
    "contentType": "text/plain",
    "contentLength": 524288,
    "blobType": "BlockBlob",
    "url": "http://127.0.0.1:10000/devstoreaccount1/food-in/in.txt",
    "sequencer": "00000000000004420000000000028963",
    "storageDiagnostics": {
      "batchId": "b68529f3-68cd-4744-baa4-3c0498ec19f0"
    }
  },
  "dataVersion": "",
  "metadataVersion": "1"
}]

The next step is to remove the surrounding [], and replace the with . Then paste the resulting JSON into the input property:

{
    "input": "
  {
    'topic': '/subscriptions/{subscription-id}/resourceGroups/Storage/providers/Microsoft.Storage/storageAccounts/xstoretestaccount',
    'subject': '/blobServices/default/containers/oc2d2817345i200097container/blobs/oc2d2817345i20002296blob',
    'eventType': 'Microsoft.Storage.BlobCreated',
    'eventTime': '2017-06-26T18:41:00.9584103Z',
    'id': '831e1650-001e-001b-66ab-eeb76e069631',
    'data': {
      'api': 'PutBlockList',
      'clientRequestId': '6d79dbfb-0e37-4fc4-981f-442c9ca65760',
      'requestId': '831e1650-001e-001b-66ab-eeb76e000000',
      'eTag': '0x8D4BCC2E4835CD0',
      'contentType': 'application/octet-stream',
      'contentLength': 524288,
      'blobType': 'BlockBlob',
      'url': 'http://127.0.0.1:10000/devstoreaccount1/food-in/in.txt',
      'sequencer': '00000000000004420000000000028963',
      'storageDiagnostics': {
        'batchId': 'b68529f3-68cd-4744-baa4-3c0498ec19f0'
      }
    },
    'dataVersion': '',
    'metadataVersion': '1'
  }
"
}

Now this JSON can be POSTed to the special URL: in the case of the example in this post the URL would be: http://localhost:7071/admin/functions/ProcessFoodBlobsEventGrid

The following screenshot shows posting using Postman:


Using Postman to post to Event Grid triggered Azure Function

Posting will cause the Event Grid triggered function to be invoked and the JSON contained inside the input property will be passed to the trigger input EventGridEvent blobCreatedEvent object. The function will execute and read in the blob called “in.txt”.

If you want to fill in the gaps in your C# knowledge be sure to check out my C# Tips and Traps training course from Pluralsight – get started with a free trial.

SHARE:

Creating Custom Azure Functions Bindings

(This article refers to Azure Functions v2)

Out of the box, Azure Functions comes with a range of triggers, input bindings, and output bindings to work with blobs, queues, HTTP, etc.

You can also create your own input and/or output bindings.

Overview of Custom Azure Function Bindings

The general process to create a custom binding is:

  1. Create a class library (e.g. .NET Standard)
  2. Create a class that implements IAsyncCollector<T>
  3. Implement the AddAsync method from the interface and add code to perform some output
  4. Create a custom C# attribute (check out my course if you’ve never created custom attributes before ) to represent the binding attribute that will be used in functions
  5. Create a class that implements IExtensionConfigProvider that wires up the new binding
  6. In the Function App, create a startup class to register your custom extension

An Example Scenario – Integrating with Pushover

Pushover is a service (with accompanying phone app) that lets you send notifications to your phone.There is a 7 day free trial to start with and the simplest way to get started is to search for the Pushover app in the app store on your phone. Once registered you can follow the instructions to set up your application/device that push notifications can be sent to. At the end of this process, ultimately you will end up with a user key and and application API token key. Both of these are needed when calling the Pushover API.

In the following example, a custom Azure Function output binding will be created that can be used from any Azure Function to send notifications. The output could be anything however, for example you could replace the Pushover API call with a Twitter call, LinkedIn call, etc.

The following example creates an output binding but you can also create bindings that get input and passes it to a function.

Creating a POCO to Represent a Notification Message

In the new class library project, add a class:

namespace PushoverBindingExtensions
{
    public class PushoverNotification
    {
        public string Title { get; set; }
        public string Message { get; set; }
    }
}

Implementing an IAsyncCollector

The next step is to create a class that implements IAsyncCollector<T> where T is the “data” that we want to pass to the output binding; in our case its the custom POCO class we just created but this could be a primitive type such as a string.

using Microsoft.Azure.WebJobs;
using System.Collections.Generic;
using System.Net.Http;
using System.Threading;
using System.Threading.Tasks;

namespace PushoverBindingExtensions
{
    internal class PushoverNotificationAsyncCollector : IAsyncCollector<PushoverNotification>
    {
        private static readonly HttpClient _httpClient = new HttpClient();

        private PushoverAttribute _pushoverAttribute;

        public PushoverNotificationAsyncCollector(PushoverAttribute attribute)
        {
            _pushoverAttribute = attribute;
        }

        public async Task AddAsync(PushoverNotification notification, CancellationToken cancellationToken = default(CancellationToken))
        {
            await SendNotification(notification);
        }

        public Task FlushAsync(CancellationToken cancellationToken = default(CancellationToken))
        {
            return Task.CompletedTask;
        }

        private async Task SendNotification(PushoverNotification notification)
        {
            var parameters = new Dictionary<string, string>
                {
                    { "token", _pushoverAttribute.AppToken },
                    { "user", _pushoverAttribute.UserKey },
                    { "title", notification.Title },
                    { "message", notification.Message }
                };

            var response = await _httpClient.PostAsync("https://api.pushover.net/1/messages.json", new FormUrlEncodedContent(parameters));
            response.EnsureSuccessStatusCode();
        }
    }
}

The key point in the preceding code is the implemented AddAsync method. This method gets called by your function when you use the binding, in this example it’s calling into the SendNotification method that talks to the Pushover API.

Notice that the constructor takes an instance of a PushoverAttribtue which we’ll define next.

Defining a Custom Binding Attribute for Azure Functions

The following code defines a .NET attribute that will be used to decorate parameters in function run methods:

using Microsoft.Azure.WebJobs.Description;
using System;

namespace PushoverBindingExtensions
{
    [Binding]
    [AttributeUsage(AttributeTargets.Parameter | AttributeTargets.ReturnValue)]
    public class PushoverAttribute : Attribute
    {
        public PushoverAttribute(string appToken, string userKey)
        {
            AppToken = appToken;
            UserKey = userKey;
        }

        [AutoResolve]        
        public string AppToken { get; set; }

        [AutoResolve]       
        public string UserKey { get; set; }
    }
}

Note in the preceding code that the [Binding] attribute has been applied and the attribute has been limited to use on parameters and return values. (You can learn more about how to create custom attributes in my Pluralsight course).

This attribute definition has a couple of string properties to represent the Pushover user and app tokens. Notice these properties have been decorated with the [AutoResolve] attribute. This enables binding expressions for the properties and allows them to be read from AppSettings with %% syntax.

Creating the Azure Function Binding Custom Extension

The next step is to create a class that implements the IExtensionConfigProvider interface. This class will define the rules that are applicable to the custom binding:

using Microsoft.Azure.WebJobs;
using Microsoft.Azure.WebJobs.Description;
using Microsoft.Azure.WebJobs.Host.Config;

namespace PushoverBindingExtensions
{
    [Extension("PushoverExtensions")]
    public class PushoverExtensions : IExtensionConfigProvider
    {
        public void Initialize(ExtensionConfigContext context)
        {
            var rule = context.AddBindingRule<PushoverAttribute>();            

            rule.BindToCollector<PushoverNotification>(BuildCollector);            
        }

        private IAsyncCollector<PushoverNotification> BuildCollector(PushoverAttribute attribute)
        {            
            return new PushoverNotificationAsyncCollector(attribute);
        }
    }
}

The preceding class is decorated with the [Extension] attribute to mark the class as an extension and the Initialize method is where the binding rules are defined. In this method we can add binding rules and also custom convertors (for example if we wanted to be able to bind to IAsyncCollector<string> and this be automatically converted to IAsyncCollector<PushoverNotification>). In this example we’re not defining any such convertors.

Once the binding rule has been added (for the PushoverAttribute we created earlier) it can be configured as an output binding by calling the BindToCollector method. This method is used to create an instance of the PushoverNotificationAsyncCollector we created earlier, in this example this is done by calling the BuildCollector method that returns a IAsyncCollector<PushoverNotification> instance.

So hopefully your still with me; at this point we have the custom binding created in the class library project, we can now actually use it in our functions.

Using a Custom Binding in an Azure Function

In the function app project, add a reference to the class library project containing the custom binding.

We can now use the custom binding just as we would any of the pre-supplied ones as the following function code demonstrates:

[FunctionName("SendPushoverNotification")]
public static async Task<IActionResult> Run(
    [HttpTrigger(AuthorizationLevel.Function, "post")] HttpRequest req,
    [Pushover("%appkey%", "%userkey%")] IAsyncCollector<PushoverNotification> notifications,
    ILogger log)
{
    log.LogInformation("C# HTTP trigger function processed a request.");

    // validation omitted for demo purposes
    string requestBody = await new StreamReader(req.Body).ReadToEndAsync();
    dynamic data = JsonConvert.DeserializeObject(requestBody);

    await notifications.AddAsync(new PushoverNotification { Title = data.Title, Message = data.Message });

    return new OkResult();
}

The preceding function code just happens to have an HTTP trigger but the custom binding can be used in functions with other triggers as well.

Notice the [Pushover] custom binding attribute being applied. The attribute decorates the notifications parameter that is of type IAsyncCollector<PushoverNotification>. (Hopefully it’s a bit clearer now how all the parts fit together…).

Now in the function body code, a notification can be send by calling the AddAsync method and passing the PushoverNotification to be sent.

Also notice in the [Pushover] attribute the binding expressions to the app key and user key stored in app settings (or local.settings.json in the development environment) This means these sensitive keys do not need to be hard coded.

There are a few final steps to getting this all to work.

The first is to register the custom binding extension by creating the following Startup class in the function app project:

using Microsoft.Azure.WebJobs;
using Microsoft.Azure.WebJobs.Hosting;
using PushoverBindingExtensions;

namespace DontCodeTiredDemosV2
{
    public class Startup : IWebJobsStartup
    {
        public void Configure(IWebJobsBuilder builder)
        {
            builder.AddExtension<PushoverExtensions>();
        }
    }
}

And in the AssemblyInfo.cs (which you can create manually) add the following:

using Microsoft.Azure.WebJobs.Hosting;

// Register custom extension of Function App startup
[assembly: WebJobsStartup(typeof(DontCodeTiredDemosV2.Startup))]

This points to the Startup class we just created.

Testing It All Out

Now just run the function app and post the following JSON to the function address (e.g. http://localhost:7071/api/SendPushoverNotification):

{
    "Title" : "Functions App",
    "Message" : "I like cheese!"
}

This will result in the Azure Function executing and sending a request to the Pushover API, will will result in a notification arriving on your phone as the following screenshot shows:

Pushover notification via Azure Functions

I hope that’s help clarify the process a  little on how to create custom binding expressions in Azure Functions. If you like me to throw the code up on GitHub let me know :)

If you want to fill in the gaps in your C# knowledge be sure to check out my C# Tips and Traps training course from Pluralsight – get started with a free trial.

SHARE: